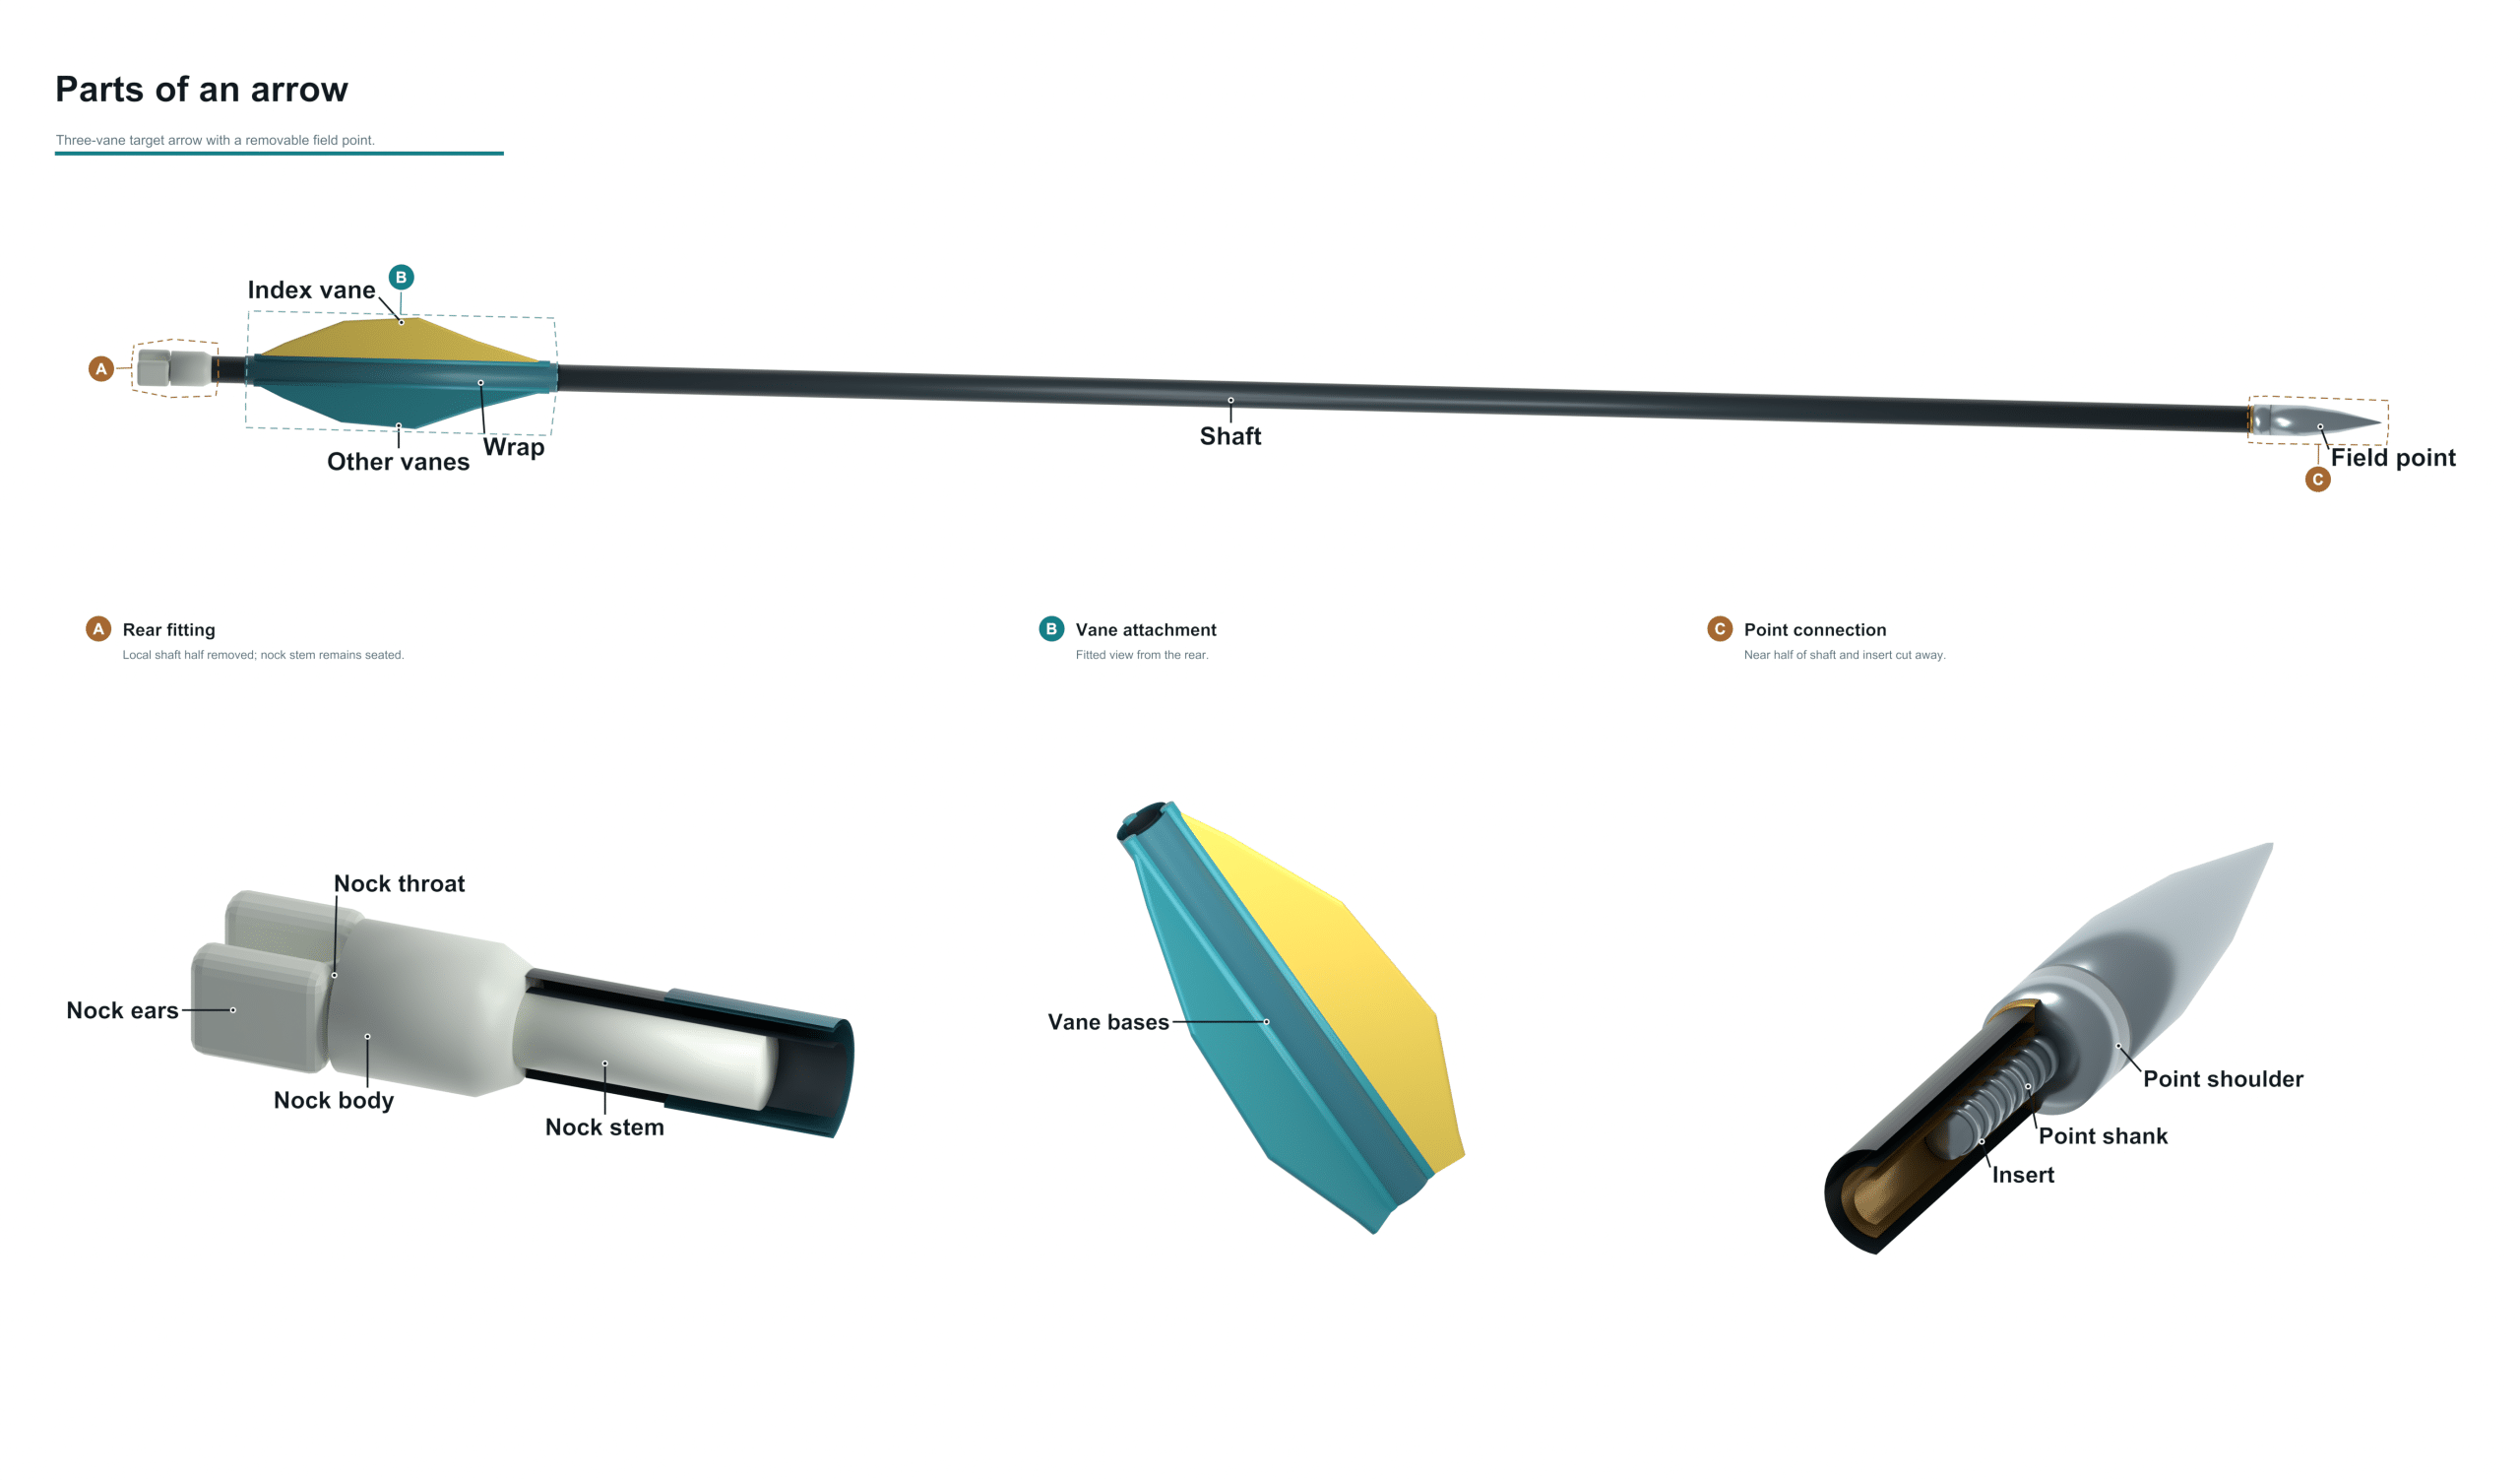
Pick up an arrow. It’s just a light stick, right? Today’s target arrow is a mini-kit of parts carefully fitted together. A piece of tubing for the body, a metal point in front, a set of plastic vanes to steer it, and a tiny bit of plastic called a nock on the back to clip onto the string. Anything out of whack, bent or loose with any of those, and you’ll know about it on the target long before you see it on the arrow. This arrow is a carbon target arrow. It is equipped with a screw-in field point, push-in nock and three plastic vanes. This type of arrow will be shot by most club archers on a weekly basis at either a foam or straw boss. Breaking it down piece by piece shows the amount of thought that has gone into something that only spends under a second in the air. Pulling the arrow apart is also helpful, as there are a few of the key components tucked into the tube. Under Explore select Point and nock assembly. From the other end of the shaft, the nock backs out and the field point slides off with its shank, away from the insert. Both remain on the same straight axis, indicated by dashed guide lines that don’t move.
What an Arrow Is Made Of
Shaft
The shaft makes up most of the length of an arrow. It’s basically a straight hollow tube constructed of some type of carbon composite. Everything else is attached to this shaft and retains everything on the same line such as the point, nock and vanes. Shafts come in spines. A shaft’s spine refers to its ability to bend with a given amount of load. You want a shaft that has enough stiffness to not flex excessively when released from the string but not so stiff that it won’t group well and flex too much.
Wrap
You may notice a very thin printed band around the shaft near the rear, called the wrap. It’s not just for looks. It provides a smooth and clean surface to glue the vanes on to rather than raw carbon. Having a bright wrap also allows you to easily locate your arrows amidst a sea of other arrows on the target face. Many archers opt for a colour scheme that suits them. If multiple people are picking up from the same boss, no-one takes home someone else’s.
Index vane
You’ll notice there are three vanes but one of them is a slightly different colour to the other two. That’s the index vane; the odd one out. It indicates how the arrow should be placed on the string. When the arrow is correctly loaded, the vanes slip past the arrow rest and riser cleanly rather than rubbing against them. It depends on your rest and your bow as to the correct position. Once you’ve worked it out, do it with all arrows the same.
Other vanes
There are two further vanes of the same colour that share the same shaft as the index vane. They’re positioned equally round the tube. These work with the index vane to act somewhat like the flights on a dart. They damp out wobble and keep the tail behind the point. Most have some sort of gentle curve or angle to them. The arrow spins as it flies. This evens out any small flaw in the shaft and also helps your arrows land closer together.
Vane bases
The vane base is a thin foot running along the bottom edge of every vane. Only the vane base comes in contact with the arrow. The vane base is a flat strip glued to the wrap. Arrows knock into one another and shoot straight through targets knocking vanes around. When you see the front end of a base begin to come loose, glue it back on or replace the vane before it flies away.
Nock body
The nock body is a small polymer fitting pushed into the back end of the tube, tucked into the tail of the arrow. The nock body is the only part of the arrow that actually makes contact with the bowstring. It has to find the arrow in the exact same spot each time. And so nocks are designed to be replaceable. If your nock gets cracked or chipped by a stray arrow, you don’t have to throw away the entire shaft. You can remove it and push in a new one.
Nock ears
Behind the groove of the nock are two little projections called the nock ears. They help guide the string down into the slot as you lift the arrow onto the string. And it just sits there in the proper position. The plastic is kind of springy. So the ears will open a bit and then close around the string. That gentle grip allows the arrow to stay on but not fall off as you lift the bow and draw back. It still allows it to go cleanly on release.
Nock throat
The nock throat is at the bottom of the slot between those two ears. The actual part that comes into contact with the string when the arrow is completely clipped on has a rounded surface. And this is where the fit is rather precise and good. When you snap on an arrow, you should hear it click slightly. But then lightly tap the string and it should fall away. If your nock is too loose, it will fall off when you draw. Too tight and it will interfere with the flight of the arrow.
Nock stem
When your arrows are assembled you will not be able to see the nock stem. This forms part of the front of the nock and pushes entirely into the shaft. It holds the nock dead centre in the tube. When the string pushes along the arrow, it does so straight along the axis of the arrow. If the stem is positioned ever so slightly off centre then when the arrow comes from the bow it may kick to one side. Normally a firm push fit is sufficient. This allows you to twist the nock to align it for orientation.
Insert
The insert is hidden within the shaft at the front. It’s a short metal sleeve which has been bonded into the tube and threaded. This provides a firm and accurate thread for the point to screw into. Carbon alone could not provide the thread. The insert also ensures that the point remains central within the arrow. Normally an insert is glued in place using epoxy or hot-melt glue. Make sure your inserts remain in position. If they don’t then they can come away in the target when you remove the arrow.
Point shank
Behind the visible tip of the field point is a threaded stem known as the point shank. It’s the threaded piece that screws onto the insert and secures the point to the arrow. Because it is removable, you can change points of varying weights without having to mess with glue. Adjusting front end weight will also affect the flight and flex of the arrow. This is what archers do to fine tune their setup and achieve the best group.
Point shoulder
The point shoulder refers to that little step where the end of the shaft joins the field point. As you drive that point all the way home, this step butts up against the end fitting on the shaft and stops it from turning any more. The square seat holds the point snugly in line with the remainder of the arrow. It also supports the end of the tube on contact. On contact with a hard object, it helps prevent the carbon from splitting.
Field point
The field point comes right on the front end. It is a smooth, rounded metal tip in the shape of a bullet. It is not a hunting point, but is meant more for target and practice shooting. Goes easily into straw or foam. It also comes out easily without tearing the boss apart. Grain weights vary on the field points. Makes sense to shoot practice with field points that are the same weight as your broadheads if you intend to hunt later. The arrows behave like each other.
Roll the arrow slowly on a table. Spin it between your fingers on your fingernail before firing. Are there bends? Gently flex the shaft and listen for any cracking. Examine all the vanes for lifted edges and all the nocks for chips. If you shoot a cracked carbon arrow, it can shatter. Drive splinters into your bow hand. Immediately retire it. Numbering your arrows is also worthwhile. Then if one keeps landing off to the side of the others, it’s much easier to spot.