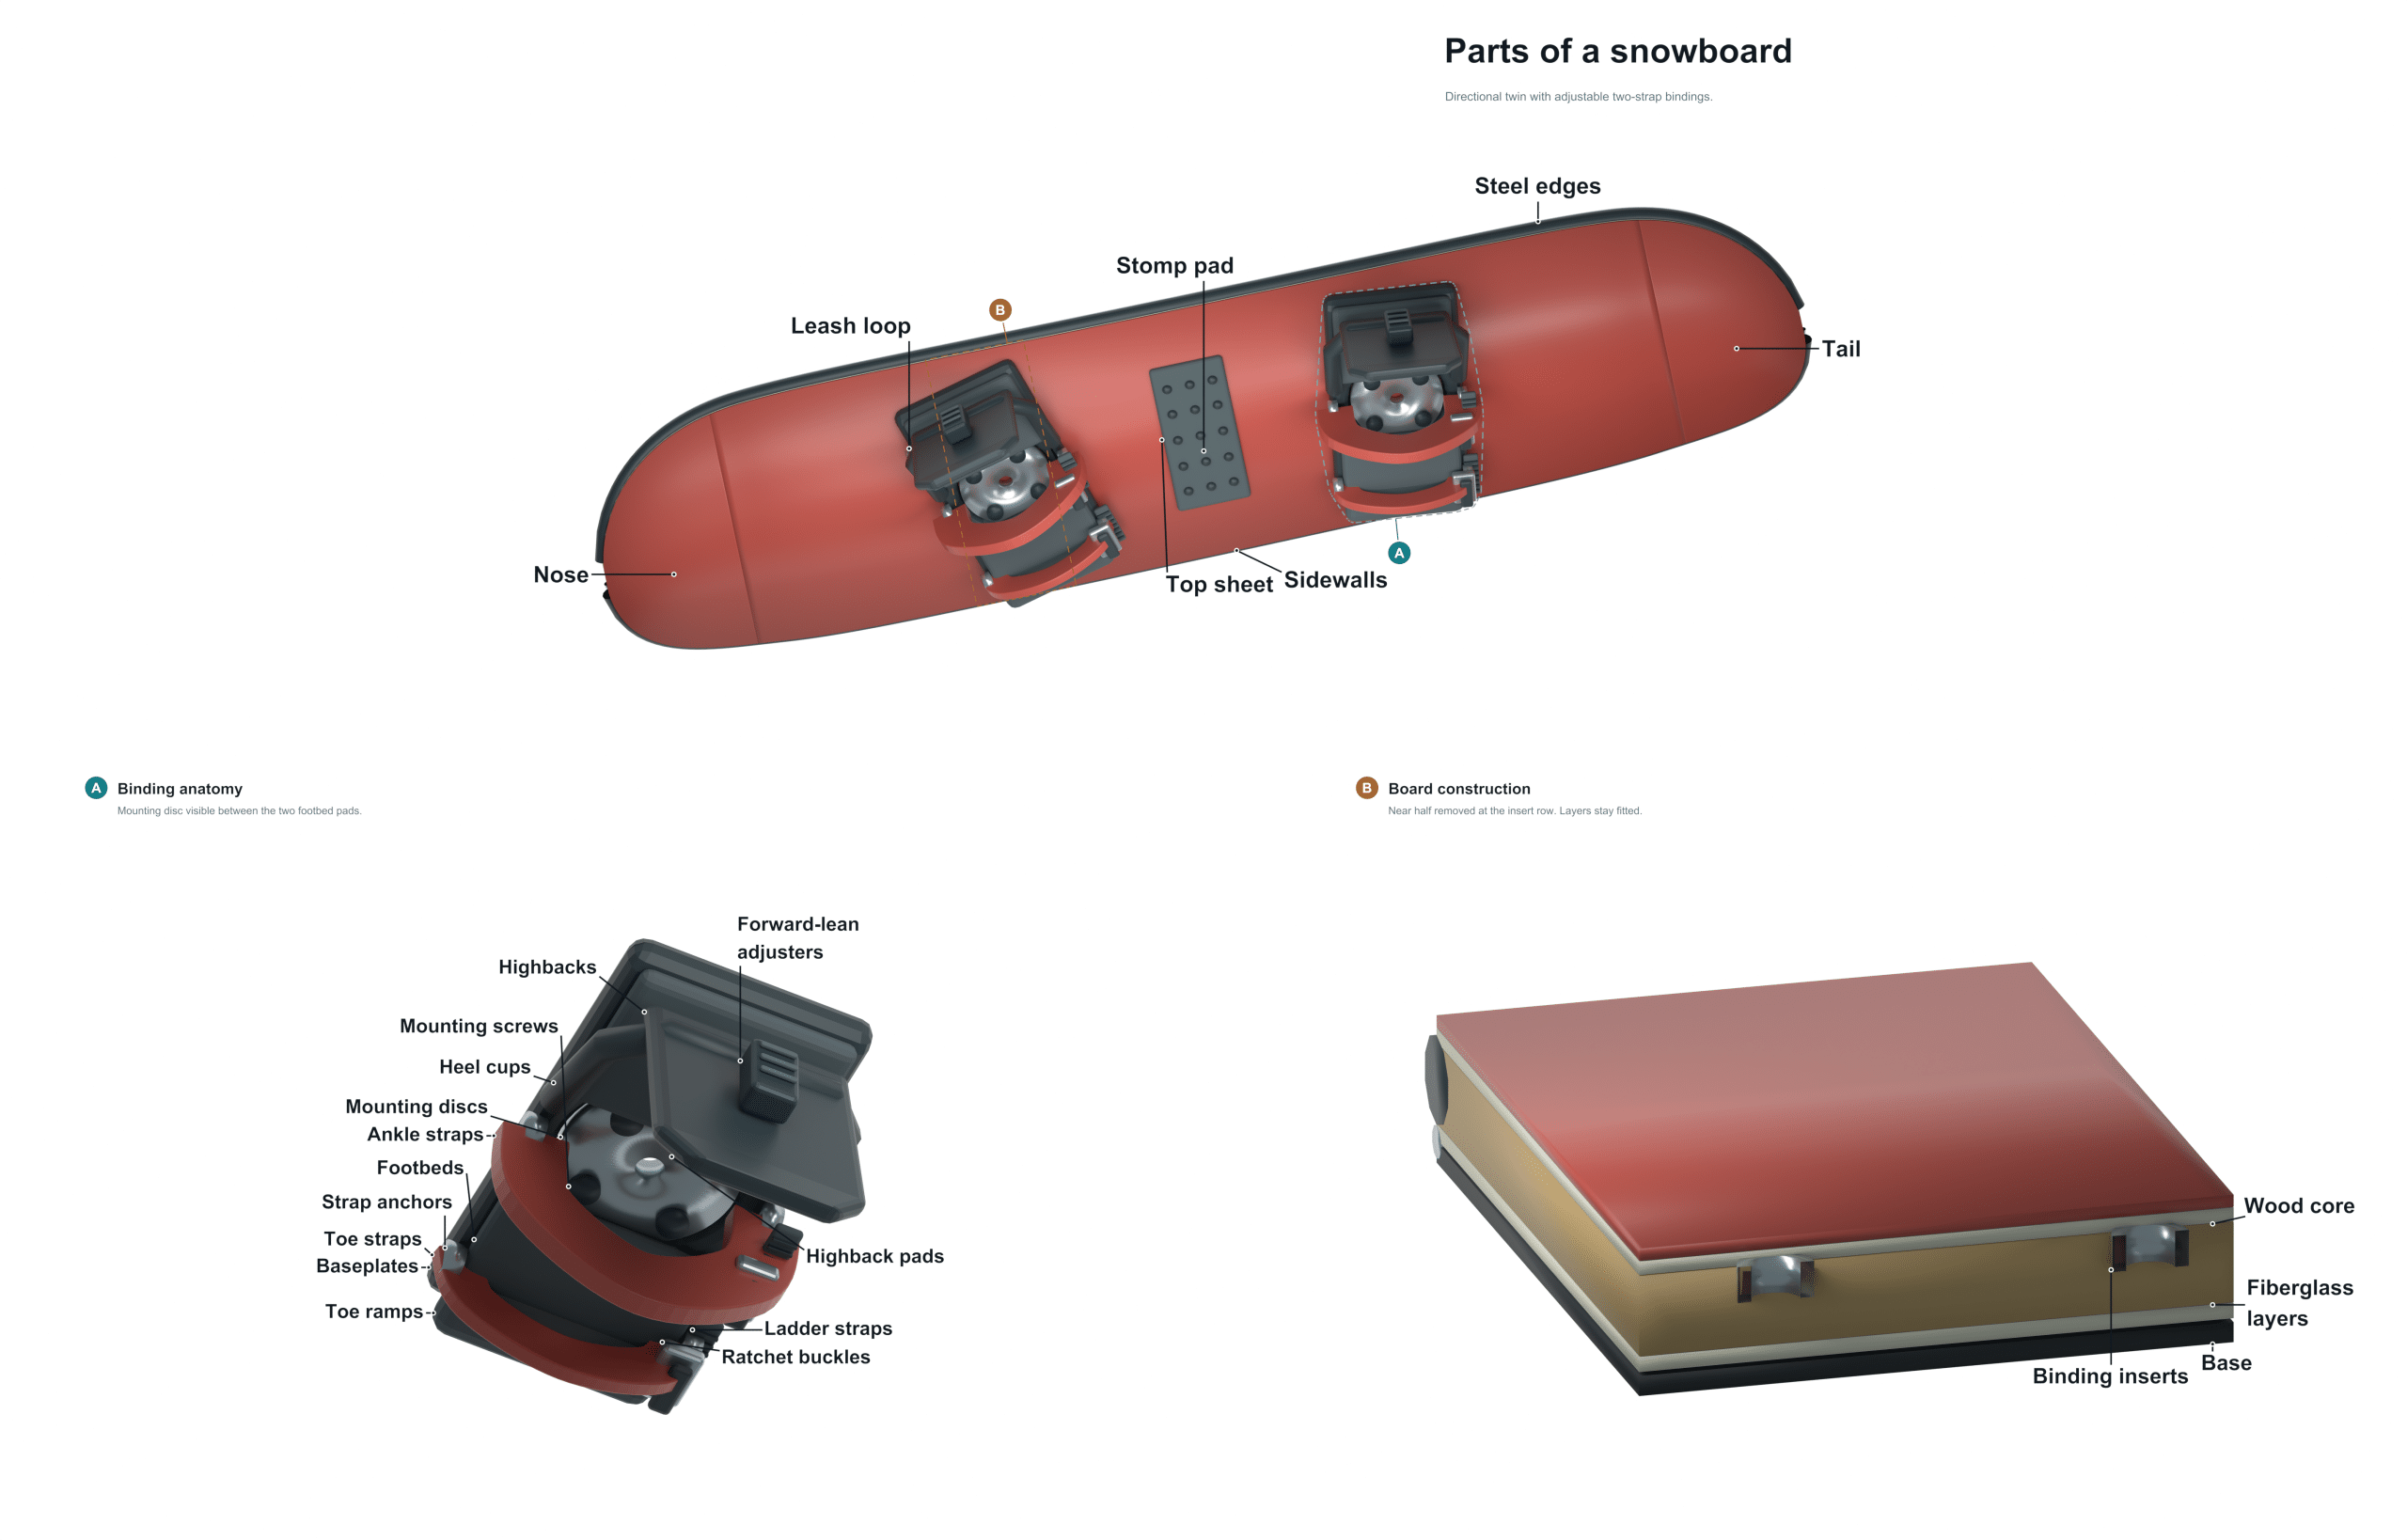
A snowboard is an item of sports equipment used for gliding across snow. It enables you to travel down a slope quickly and under control. Unlike skis that operate individually for each foot, a snowboard is one unit. Both feet are strapped to the board. The position of your body determines where it goes and how stable it will be.
Take a look at the annotated image above for an explanation of what’s on there. This is broken down into various parts of the board. Each section has a particular look or mechanical function. Knowing about them helps you ride better and take care of your kit.
Parts of a Snowboard
Nose
The Nose refers to the front end of the snowboard. The end that you would lead with if you prefer riding regular or goofy style. Generally speaking, the nose will be a bit softer and a little wider than the tail. This allows the board to plane across soft snow and not dig into it. Catching your toe edge happens when the nose is too stiff. Also, if the nose is too stiff, you may find yourself fighting to keep the front of the board up in powder. Manufacturers shape the nose to help balance your weight. This gives you enough lift to cruise around without putting to much pressure on your front foot.
Tail
On the other side is the Tail. Relative to the direction in which you ride, it’s the back part of the board. Depending on if it’s a twin or directional board, the tail will be shaped different and/or stiffer than the nose. Regardless, the tail is what gives the board its turning power. It also helps stabilize the board during high-speed runs. Engaging the tail happens when you step down with your back foot. That’s how you start (or finish) a carve. Keeping the tail in good condition means your board will track straight and not flutter around uncontrollably behind you.
Base
Running all the way around the bottom of your snowboard is the Base. The base is what directly touches the snow. Typically it’s made from a waxy polyethylene called P-tex. This allows for slick sliding across the snow. To keep up speed, you’ll want to wax your base regularly. Not only does wax help you go faster but it prevents the base from soaking in moisture or drying out. Check the base for any deep scratches or even core shots. These will absorb water and slow you down like crazy on the hill.
Toe Edge
The toe edge is the metal rail that runs along the side of the board nearest your toes. This edge is key when you’re carving turns. On ice or hard-packed snow, this edge gives you a grip. When you want to turn, you push down on the board with the balls of your feet on this edge. During aggressive turns, there’s a lot of force applied to the toe edge. Consequently, the toe edge can get chipped and dulled. Sharpening the toe edge is one of the most critical aspects of maintaining these boards. That will allow you to handle them predictably in various conditions.
Heel Edge
The other edge is the Heel Edge, located below your boot heels. Pressing into it will make your heels bite into the board, allowing you to turn backwards or stay steady while riding switch. The heel edge complements the toe edge. They work together to provide the bite necessary for precise control. Try pushing up on the heel edge and see if you feel a bit slipperier on hard snow. Then that edge may need realignment or sharpening. Both edges should be equally strong and used with proper edging technique.
Edge
When we talk about Edge, in general, it is referring to the metal sidewall(s). It includes both the heel section and the toe section that runs the length of the board. The metal is inserted into the wood core. That gives the board enough friction to prevent it from slipping side to side. The angle of those edges relative to the base is known as the sidecut. Sidecut is what makes the board turn sharply or not so sharply. When you lean into a turn, you’re feeling the transition from the base to the edge. That’s where you set up the direction you want the board to go.
Sidecut
Sidecut refers to the hourglass shape of the snowboard. From above it looks like an hour glass. This curve determines a board’s maneuverability and turn radius. Tighter turns occur on boards with a deeper sidecut. Longer, more stable arcs happen at higher speeds on boards with a shallow curve. Notice that the curve is most pronounced in the middle of the board. This affects how the edges interact with the snow as you carve. Knowing what sidecut your board has helps you predict how it will behave in various terrain.
Waist
The waist is the narrowest point on the board. That’s where your feet are attached (where they mount) to the board. The waist gives you the place to steer. It also assists in balancing out your weight. If you have bigger boots, a wider waist might be more stable than a narrower one. It will keep your heel/toes from digging into the snow while making turns. A narrow waist might make it easier to turn quickly, but you may need to shift your stance to prevent edge catch. Overall this area is key to how the board feels under foot and how flexible it is.
Topshelf
Topshelf This term refers to the raised edge of the topsheet. This is just above your bindings. Underfoot, this structure makes the board stiffer. It enhances energy transfer and responsiveness. The topshelf prevents the board from twisting too much when you put pressure into your bindings. The presence of a well-defined topshelf gives the board a snappier feel which helps turning. You don’t need to lean too far forward or back to make a turn.
Insert pack
Below the topsheet there is a layer of plastic called the Insert pack. This has pre-drilled holes for the screws that hold your bindings on the board. The insert lets you change where you want your bindings on the board. Move them back and forth as well as rotate them to fit how you like to stand on the board. Make sure when tightening your screws down that they are done properly so the bindings don’t shift under you while riding. If you overtighten the screws or strip them out, these inserts will wear over time. You should of taken care when setting it up.
Bindings
Bindings are the strap systems that attach your boots to the board. They are the main interface between you and the equipment. They include straps, a baseplate, and a highback. These combine to keep your foot in place. The stiffness and response of the bindings affect how quickly you can transmit your intentions to the board. It reacts to what you do. You can adjust the angle and forward lean of the bindings. That way you can customize your control and comfort. Bindings need to be properly fitted. They should effectively pass your intentions to the snowboard.
All these pieces add up to a snowboard that is an extension of your body. It responds to the subtle shifts in your weight with control and smooth movement. When your ride doesn’t feel consistent, start by checking the edges are still sharp. Then make sure bindings are aligned and the base is in good condition. Taking care of these pieces will ensure that the board does what it’s supposed to do. This ensures you can enjoy the ride. There’s no need to be fighting your equipment. Knowing how each piece works gives you the ability to diagnose problems quickly. It keeps your gear in tip-top shape for the season.