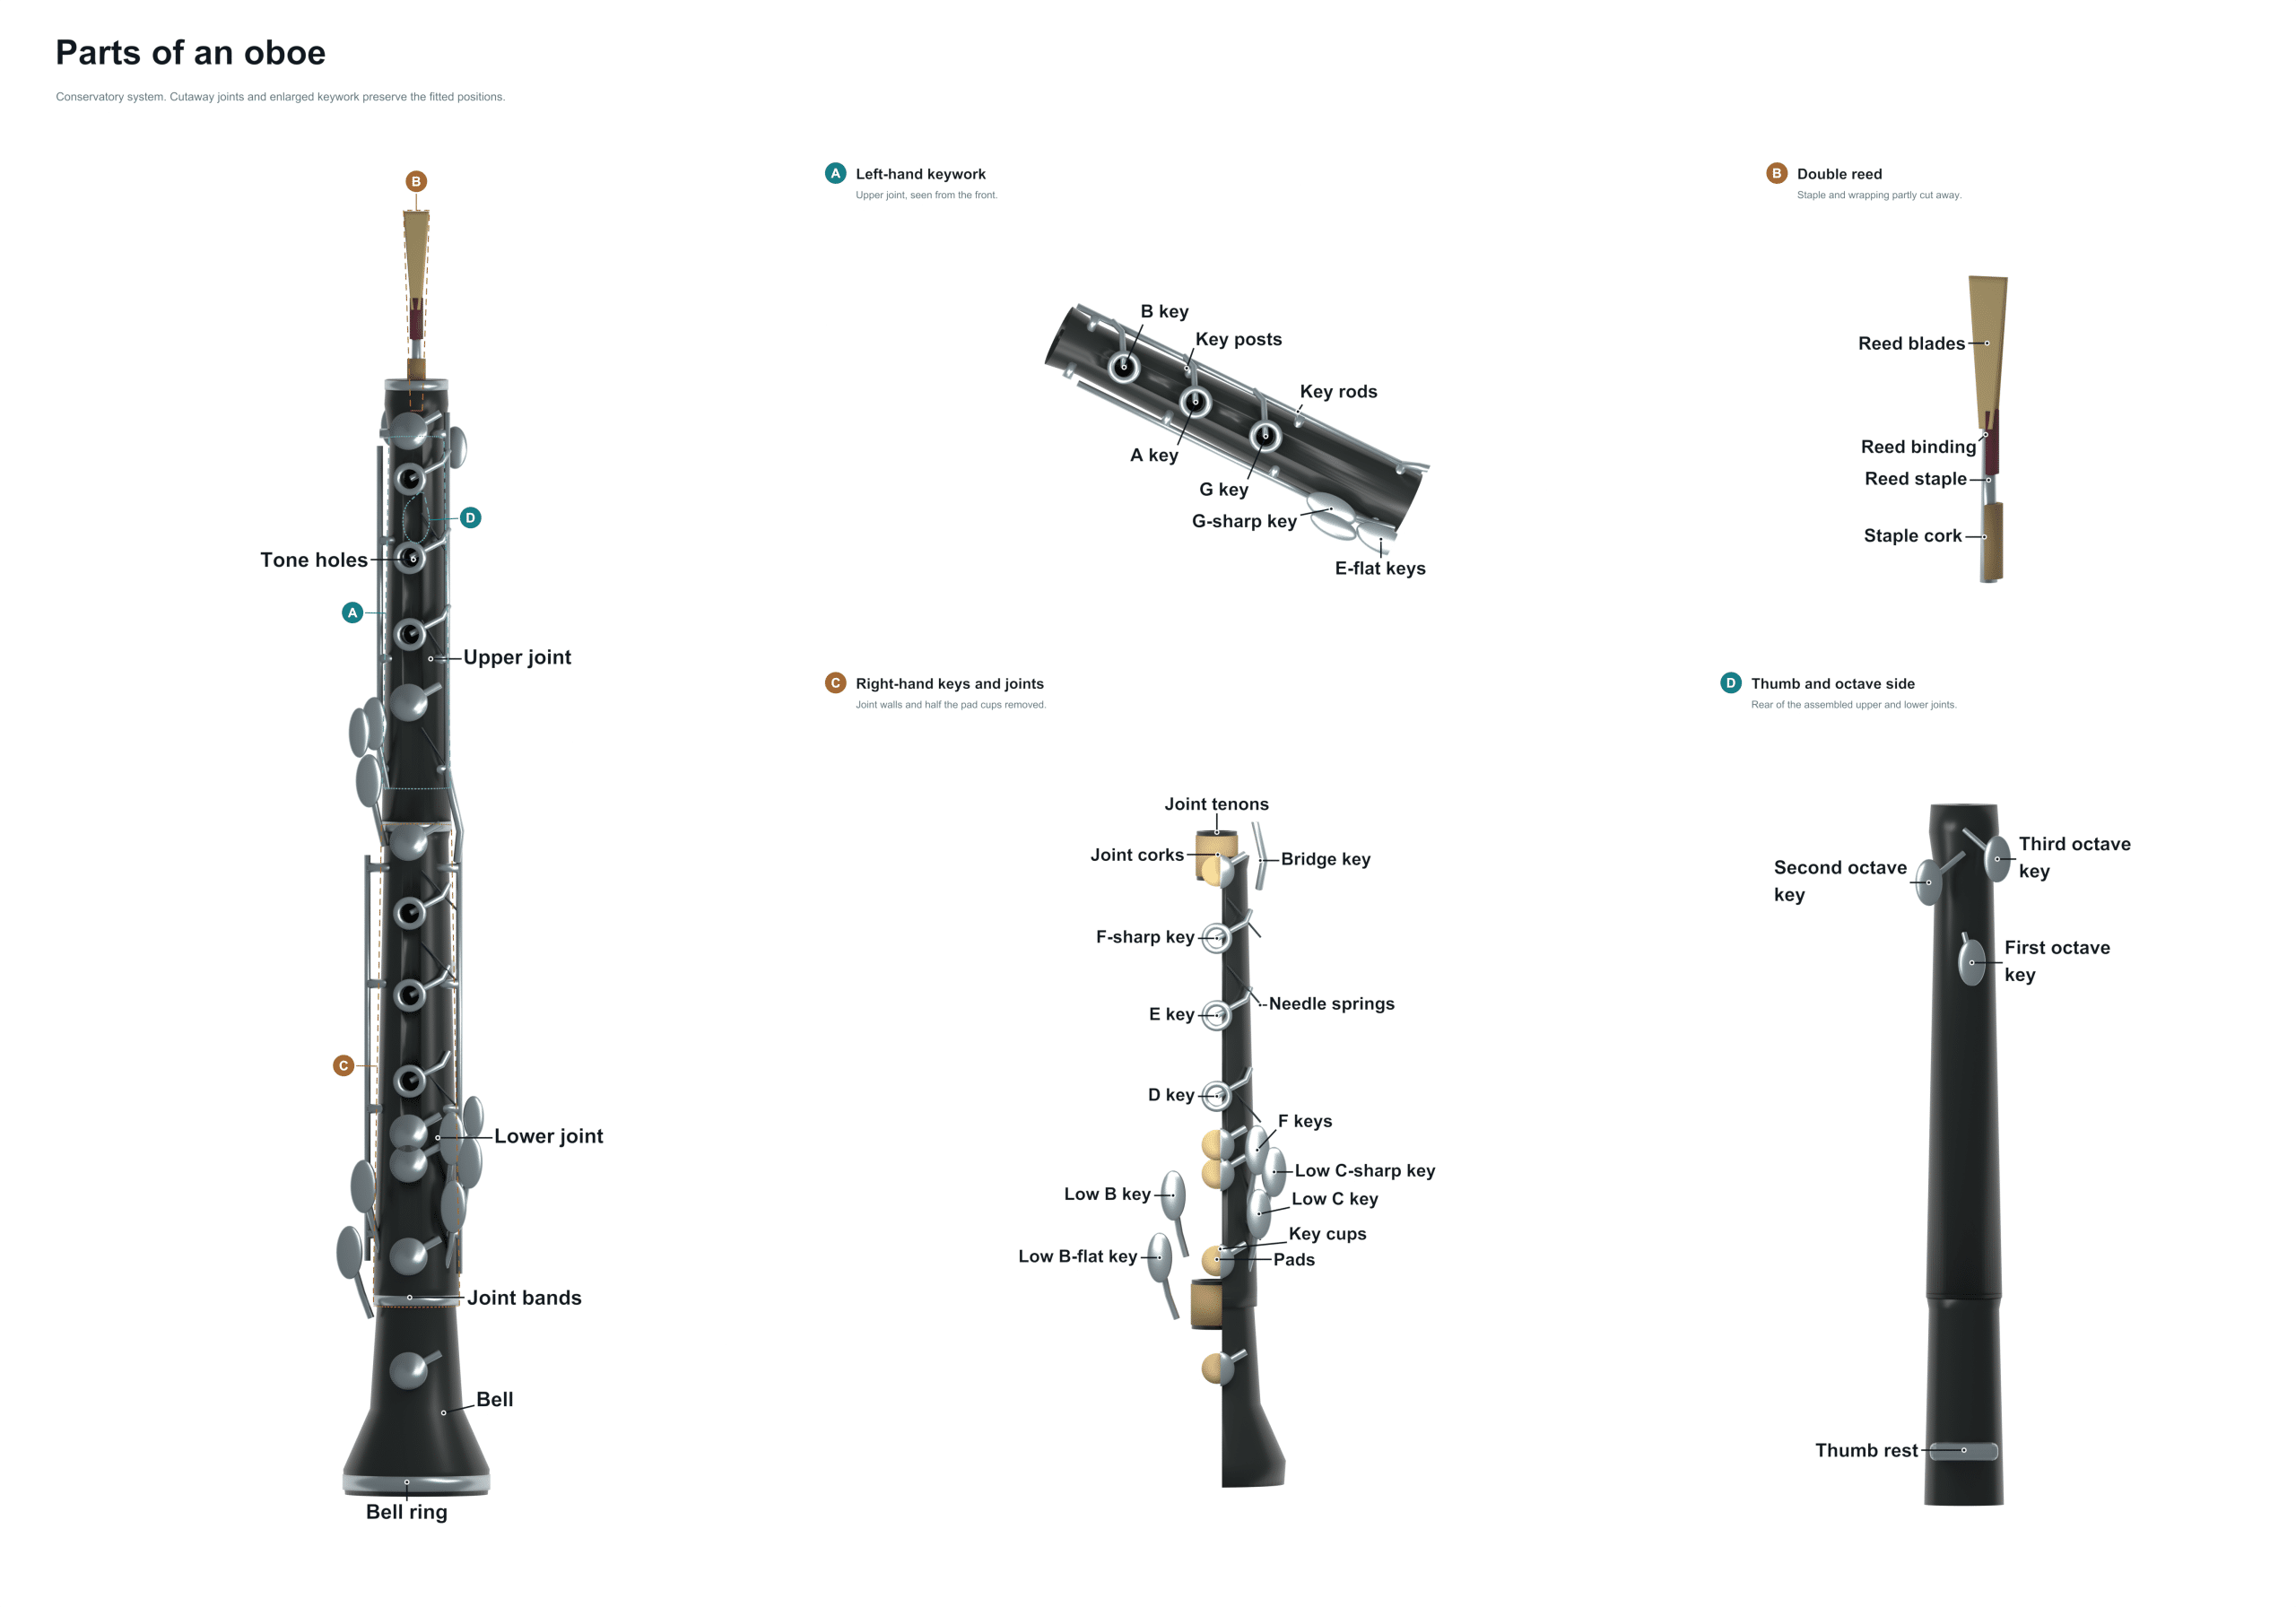
As the name suggests, it is a woodwind instrument that use a double reed to produce its sound. It has a unique place in both chamber and orchestral music and has a warm sound. To make an oboe sound, the player must use their breath to create a vibration between the two cane ‘reeds’. This demands considerable strength in the embouchure and breath control.
Knowing something about the oboe’s parts will help you gain a clearer understanding of the instrument. The diagram above illustrates the key features. As you continue reading, you should of be able to identify the sections. Getting familiar with them will enable you to appreciate the acoustic and mechanical workings of the oboe.
Parts of the Oboe
Reed
The reed is where all the sound comes from. It’s made up of two very thin blades of cane that is bound around a small plastic or metal tube. When you blow across the reeds they vibrate and produce the sound. Because the reed is such a delicate piece of equipment it needs to be soaked regularly and adjusted too. Eventually, you will need to change the reed as it will dry out and distort the shape of the cane. The reed sits directly on top of the staple. How open the reed is, and how strong it is, affect the tone quality of the instrument and its ease of playing. If you have a good reed it should feel balanced and respond immediately to your breath. A leaking or stuffy reed might indicate it’s wearing out.
Staple
A staple is a short, curved piece of metal. It joins the oboe’s upper joint to the reed. It acts as a bridge between the body and the reed to make sure it attaches firmly to the upper joint. The staple provides a comfortable angle for your lips to sit on the reed. Although a simple design, this part is crucial in keeping everything aligned. Without this, the reed will twist around when you play which can hinder airflow. This can lead to intonation problems too. Generally speaking, if your staple is bent or even slightly loose, it can affect the airflow and cause intonation issues, but it can be cleaned easily using a soft cloth. This keeps the staple hygienic, removes any build-up of saliva, and stops it from corroding.
Upper joint
The upper joint is the top section of the instrument’s main body, located just beneath the staple. Here we have a number of tone holes and keys that enable us to play the higher notes in the range of the instrument. This section is vital as it determines the first pitch and how the instrument responds. It is nearest to where the sound comes from. Often the keys on the upper joint combine with the keys on the lower joint. This results in some quite complex fingering. Any misalignment or cracks in this section may affect the clarity of the high register. This is because it has to deal with the vibrations at a higher frequency.
Lower joint
The lower joint joins onto the bottom of the upper joint, and it is the largest part of the oboe. Here you will find most of the keys of the instrument housed in the lower joint. This includes the mechanism for playing the lower and middle registers of the instrument. The complexity of the keywork on the lower joint allows for the wide range of musical expression that the oboe is famous for. Good intonation relies on correct alignment of both the lower and upper joints. Make sure the joins screw together easily without any need to force them into place. Correct positioning of the thumb on this section can help keep the instrument stable when playing; many students find this useful.
Bell
Bell. The bell is the flared end of the oboe. It is towards the very bottom of the instrument. Its main purpose is to project the sound outward. It also assists with blending the tonal qualities of the lower notes. Although it appears decorative, the bell has an important role to play in both the tuning and the acoustic resonance of the instrument. There are some oboes that have detachable bells for certain musical needs or when travelling. A fixed bell is most common on standard models. Take care with this section as the metal can be dented quite easily which might impact on the sound projection.
Octave key
The octave key is a specific lever operated by the left thumb, located on the back of the upper joint. The left thumb operates a specific lever called the octave key which is situated on the rear of the top joint of the instrument. When pressed down, it opens a vent hole in the instrument allowing it to jump to the next harmonic series. This raises the pitch an octave and is central to being able to play the full range of the oboe. It allows us to move between the high and low registers. The pad on this key needs to be airtight for it to work well. It requires regular checking for any signs of debris or wear. If the octave key feels unresponsive or sticky, your technician might need to clean or adjust it.
Keys
The keys are a complex system of springs, rods and levers that cover the tone holes when they are pressed. This enables them to be played quickly and precisely. No need to have to place your fingers over and under each hole. The key action must be accurate. A small misalignment will result in the note not sounding at all or being flat. Regular servicing includes looking out for any loose screws. Also make sure the springs are set correctly. When properly regulated, the keys snap into position satisfyingly.
Tone holes
The oboe has circular openings called tone holes. These are drilled into the wooden body of the oboe. As you press the keys up they open the hole revealing the inner part of the tube to the air. It alters the effective length of the resonating column. In turn, this alters the pitch. During construction, each hole’s position and size are carefully calculated so that it has accurate pitch in every register. Over time the edge of these holes will begin to wear. This can change the tuning ever so slightly. If you notice your oboe is out of tune, check the condition of the wood surrounding the tone holes. They can develop cracks if the instrument is not stored in a consistent humidity environment.
Thumb rest
A thumb rest is a little piece of support on the rear of the instrument. Commonly, it’s close to where the octave key is located. It gives your left thumb somewhere comfortable to rest so it balances out the weight of the oboe as you play. It cuts down on hand fatigue. It also allows for more accurate use of fingers. Often the thumb rest can be moved about a tiny amount to suit your playing posture and hand size. Having this rest in a comfortable and secure position is important. It will help to ensure good posture when practising for extended periods.
If you consider the oboe as an entire instrument you realise that all its parts depend on one another. The reed begins the sound. The tone holes and keys control the pitch. The bell throws the sound out into the world. If something isn’t right about the sound of your oboe or if it’s proving hard to play then start with the reed. Next examine the joints to make sure they are correctly aligned. Finally, run your fingers over the keys to ensure they move smoothly. Caring for these elements regularly will keep your oboe in good playing order. It will give you the sound it was meant to make.