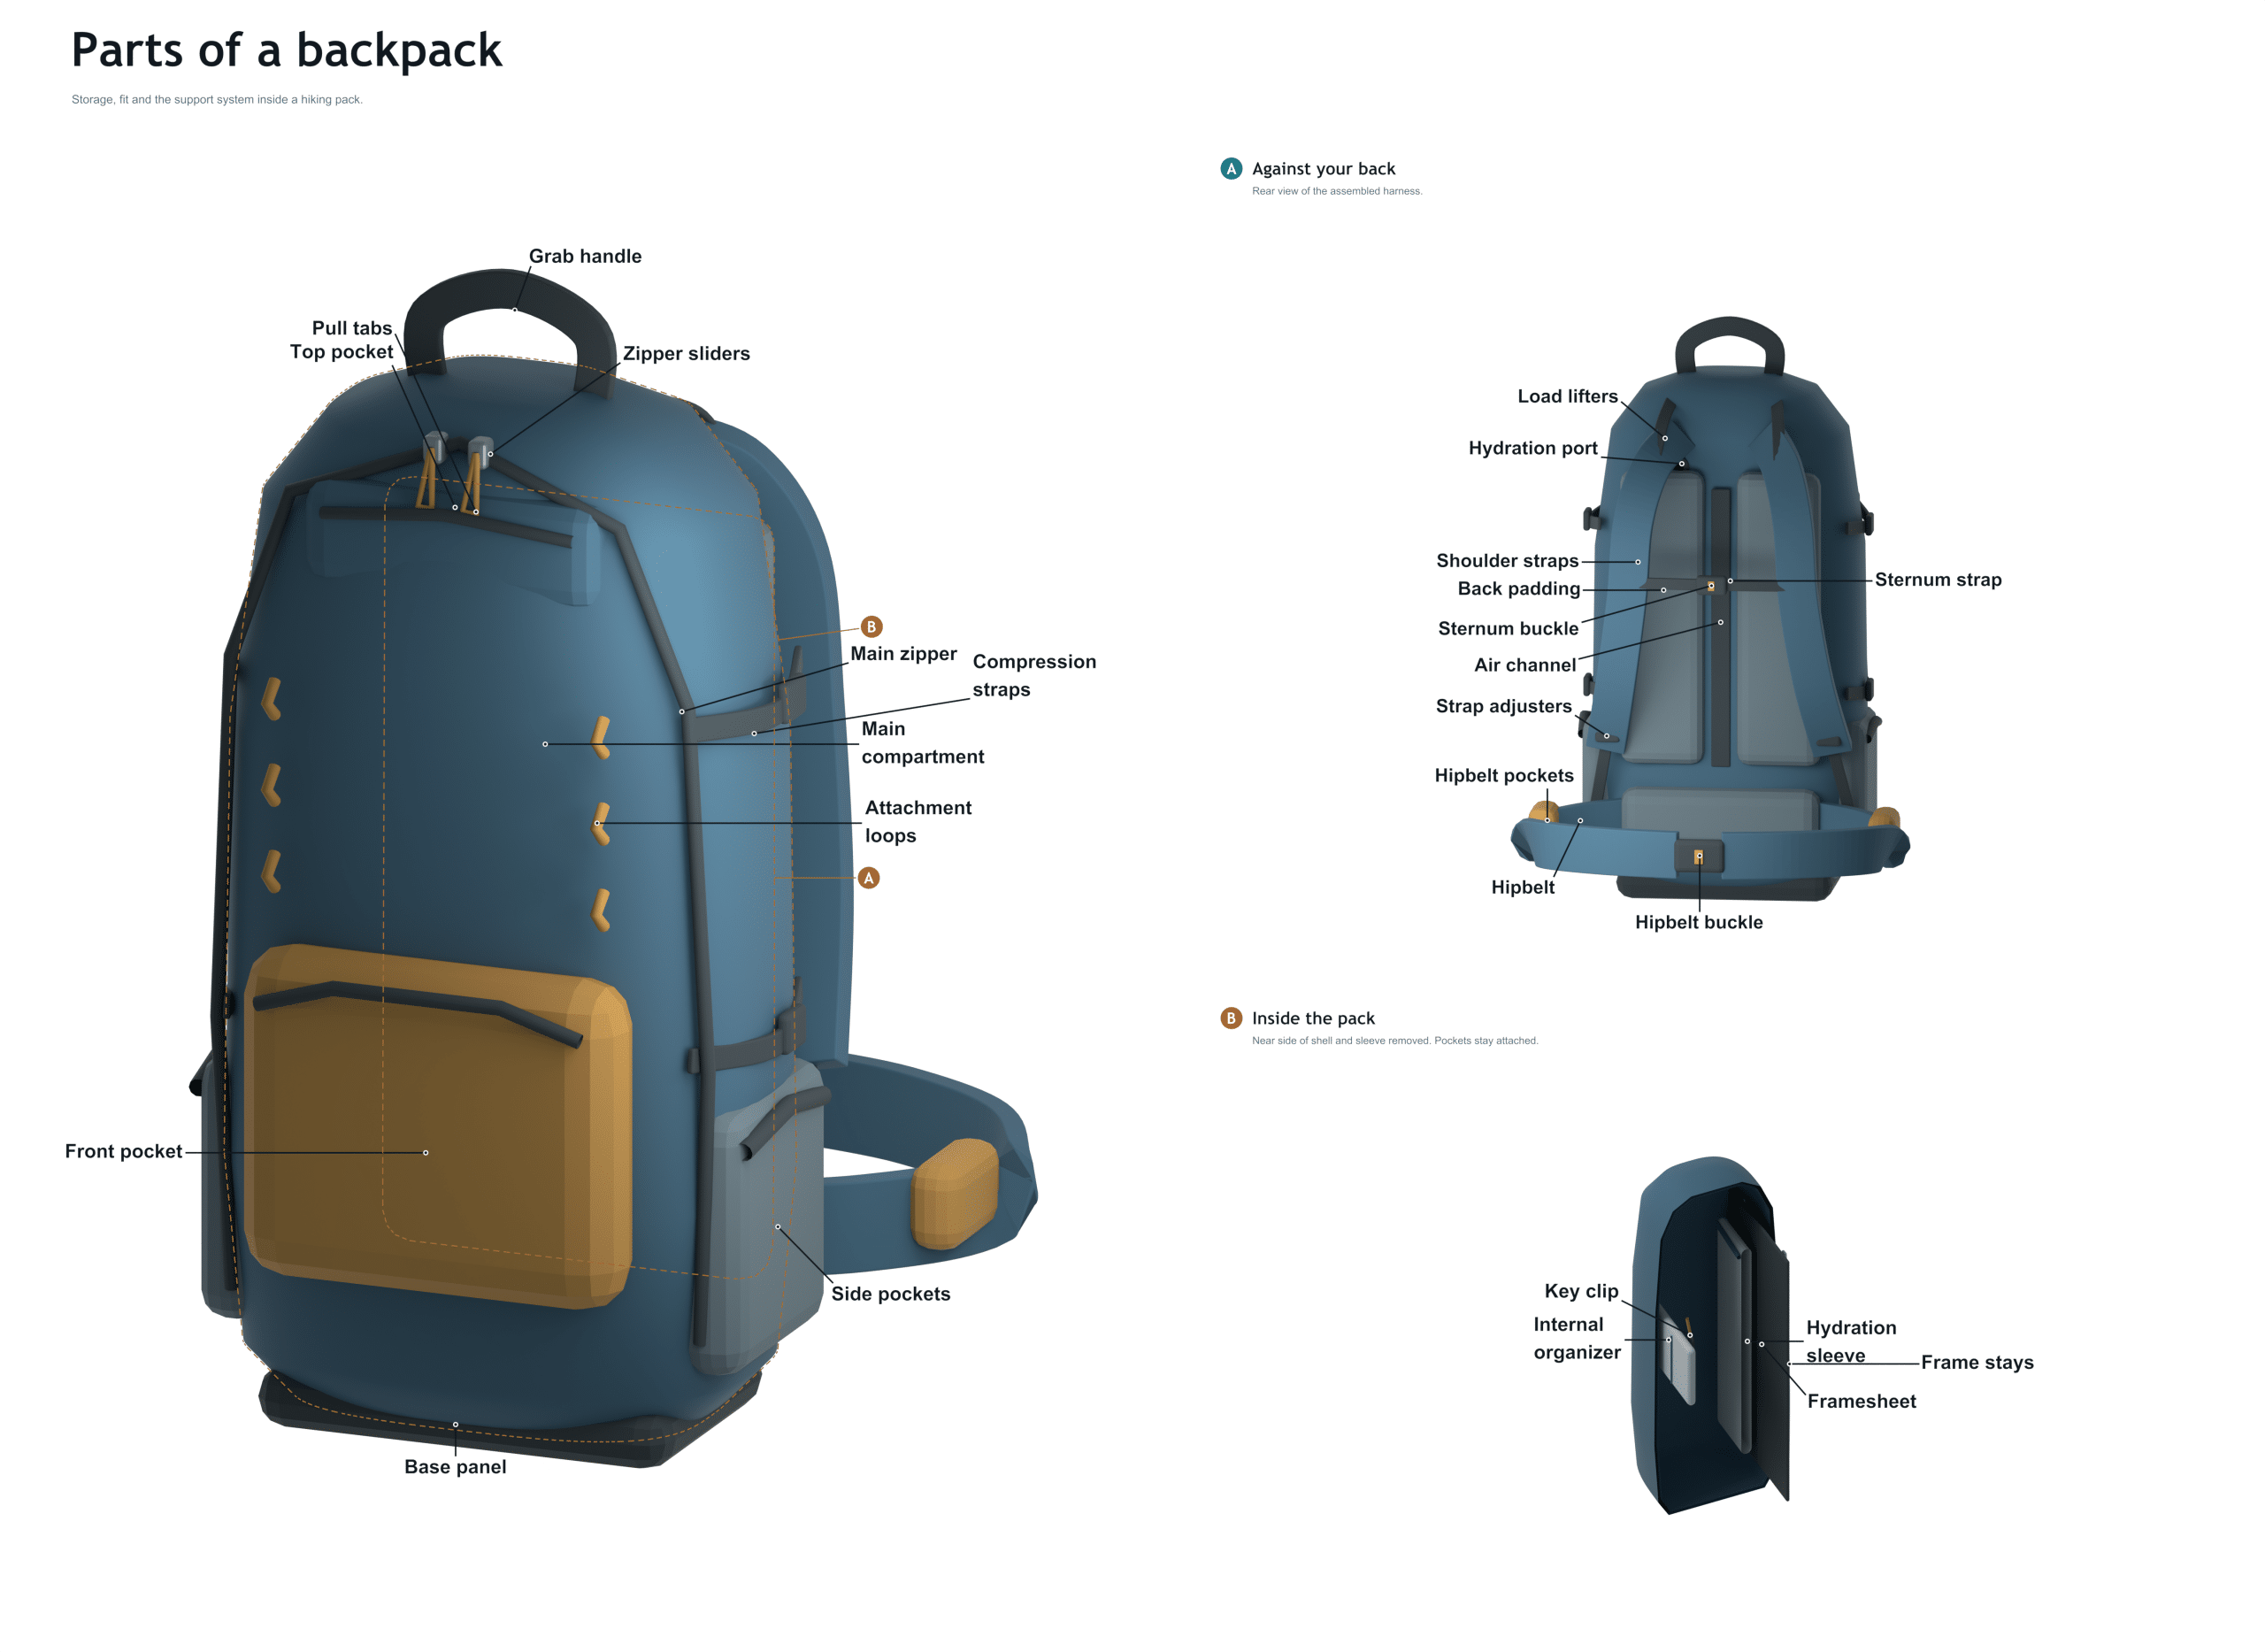
Your backpack isn’t just a place to stuff gear into; it’s an engineering system designed to protect your possessions, distribute weight, and keep you comfortable while walking around town or on multi-day treks. Knowing what all the parts do and how they interact makes packing and carrying your load easier, and much more enjoyible!
If you want to know more about the structure of your pack, here’s a breakdown of the major functional and structural features of most hiking packs. Use this list as a guide the next time you’re looking at a pack, or if you just want to label all the parts of yours (above). Once you know which parts are what, you’ll have greater control over what goes where in your pack.
A Guide to Your Backpack Parts
Top Handle
Atop the pack sits a solid loop, what I’m calling the Top Handle. This is an easy place to grab and hoist the bag on/off of your back or use as an attachment point if you want to hang it from a shelter hook. You won’t be carrying the entire weight of the pack on this handle very far but in tight quarters, this handle will serve you well.
Top Lid
The Top Lid covers the opening of the main compartment, and it is sometimes reinforced with smaller pockets for common items like your cell phone or compass. This adds some structure to the top part of the bag and protects your equipment from dirt and moisture. If you’re looking to save weight, you’ll often be able to completely remove this top lid and turn the backpack into an ultralight configuration.
Main Compartment
Taking up most of the space in the backpack is the Main Compartment. Here is where you keep clothing layers, tent, sleeping bag and other gear you don’t want to be rubbing against your back. The closer to your back it is, the better because it keeps your center of gravity stable. Put the heavier things in this compartment. It will also keep the pack from pulling you backwards.
Front Pocket
A second storage area known as the Front Pocket sits between the main compartment and the top of the pack. It is typically above the main compartment but under the top lid. You can stash snacks or a first-aid kit in there for quick access without having to unpack everything from your main compartment. Most are zippered so they stay closed on the move.
Daisy Chain
A Daisy Chain is a series of vertical loops made from woven fabric along the front of the pack. These provide a place to lash your tent or other gear, such as a sleeping pad, to the outside of the pack. This increases how much the pack can carry while keeping gear out of the main compartments where it would get in the way of comfort.
Usually a stretchy mesh pocket found either on the right or left side of the bag, this is a great spot to stash your rain jacket, trekking poles or water bottles that you want easy access to. It is made from elastic so the pocket can expand and contract depending on what you throw in it.
Bottom Panel
The bottom panel is the base of the pack, and it often has an extra compartment designed to fit a sleeping bag or dirty boots. This keeps your gear off the dirt and moisture of the ground. You can also remove this entire section on some packs, turning it into a standalone duffel bag to carry around nearby.
Compression Strap
This is a compression strap. This is a webbing strap that goes across the top (or down both sides) of the pack. As they is tightened, they compress the contents of the pack, keeping everything in place and the load stable on your back while walking. The adjustment can be especially helpful if the pack isn’t completely packed out; it will pull the weight in close to your back for a more balanced ride.
The shoulder straps carry most of the weight on the pack and wrap across your shoulders. Proper padding and contouring are vital for comfort. It should not dig into your collar bones but should fit snugly up against your back. Adjust these accordingly. These carry the weight off your neck onto your stronger muscle groups in your upper body.
Across your chest, there’s also typically some sort of horizontal webbing connector called the Sternum Strap that connects both of the shoulder straps. This strap helps keep them in place on your shoulders while hiking down steep terrain and doing strenuous activities. You can also adjust how tight or loose it is with a buckle or an adjustment slider for the most comfort on most moddern models.
Back Panel
The Back Panel is the surface that sits against your back. Typically it will be a bit stiff with frames or ventilation channels and/or padding to give you some air gap between the pack contents and your back. This helps keep you cooler and shields your back from any hard edges in your stuff inside the pack so you’re more comfortable for longer on the trail.
Hip Belt
This is where I will address the Hip Belt. The Hip Belt is a wide, padded strap which circles your hips and waist. This is the most important piece to even out the weight in your back since it takes up to eighty percent off the load from your shoulders to your legs. If you have a hip belt fitted correctly, then it will sit on top of your hip bone (the boney part of your pelvis), not your soft midsection.
Hip Belt Pocket
Small but mighty, the Hip Belt Pocket is an integrated pocket on the outside of the hip belt. You can stash a trail map, lip balm, or some other small item there so it’s never far away when you need it. The convenient location lets you keep them off your body with your hands free and still have them in easy reach while on the trail.
With everything dialed in properly you’ll barely notice the pack’s there; it’ll be an extension of your body instead of something weighing you down. Start with your hip belt if you’re uncomfortable and can feel that weight shifting off of your hips. Make sure that the bulk of it is riding on your hips. Use the compression straps to keep things stable. This will make every trip go much smoother and faster.
You should of checked the fit first. It would of been easier. This helps make the pack feel more naturaly balanced. The furnitures in the bag can shift. It is important to recieve the right fit.
One adult-sized sofa would be too big. You might want to avoid a luxurius pack if you want light. The pack can absorbs weight better. You’ll find that the hip belt works better then the straps. It’s a different than feeling.
Making sure the load is stable is better than just packing. It’s easy to recieve a bad fit. The weight is better based off your hips. If you dont adjust it, it might feel bad. It should steers the weight well.
You should check the lid. It is comfortabley placed. A armchair would be too big. This is a good tip. The weight sit well.
You can use a smaller pocket. It’s better than a large one. You’ll want to check it. It’s a good idea.
The pack is ready. You’ll like it. You can go now. The gear is packed. It is done.