How many times have you seen a pair of scissors? In your workshop or home, they’re a common tool. Yet you may not think about the mechanics of what makes them work.
Scissors is a type of class-one lever. That’s how they cut effectively with minimal effort from you pushing down on the handles. Knowing how scissors are made will help you care for them over time. But it will also help you use a pair more effectivly.
The Parts of Scissors
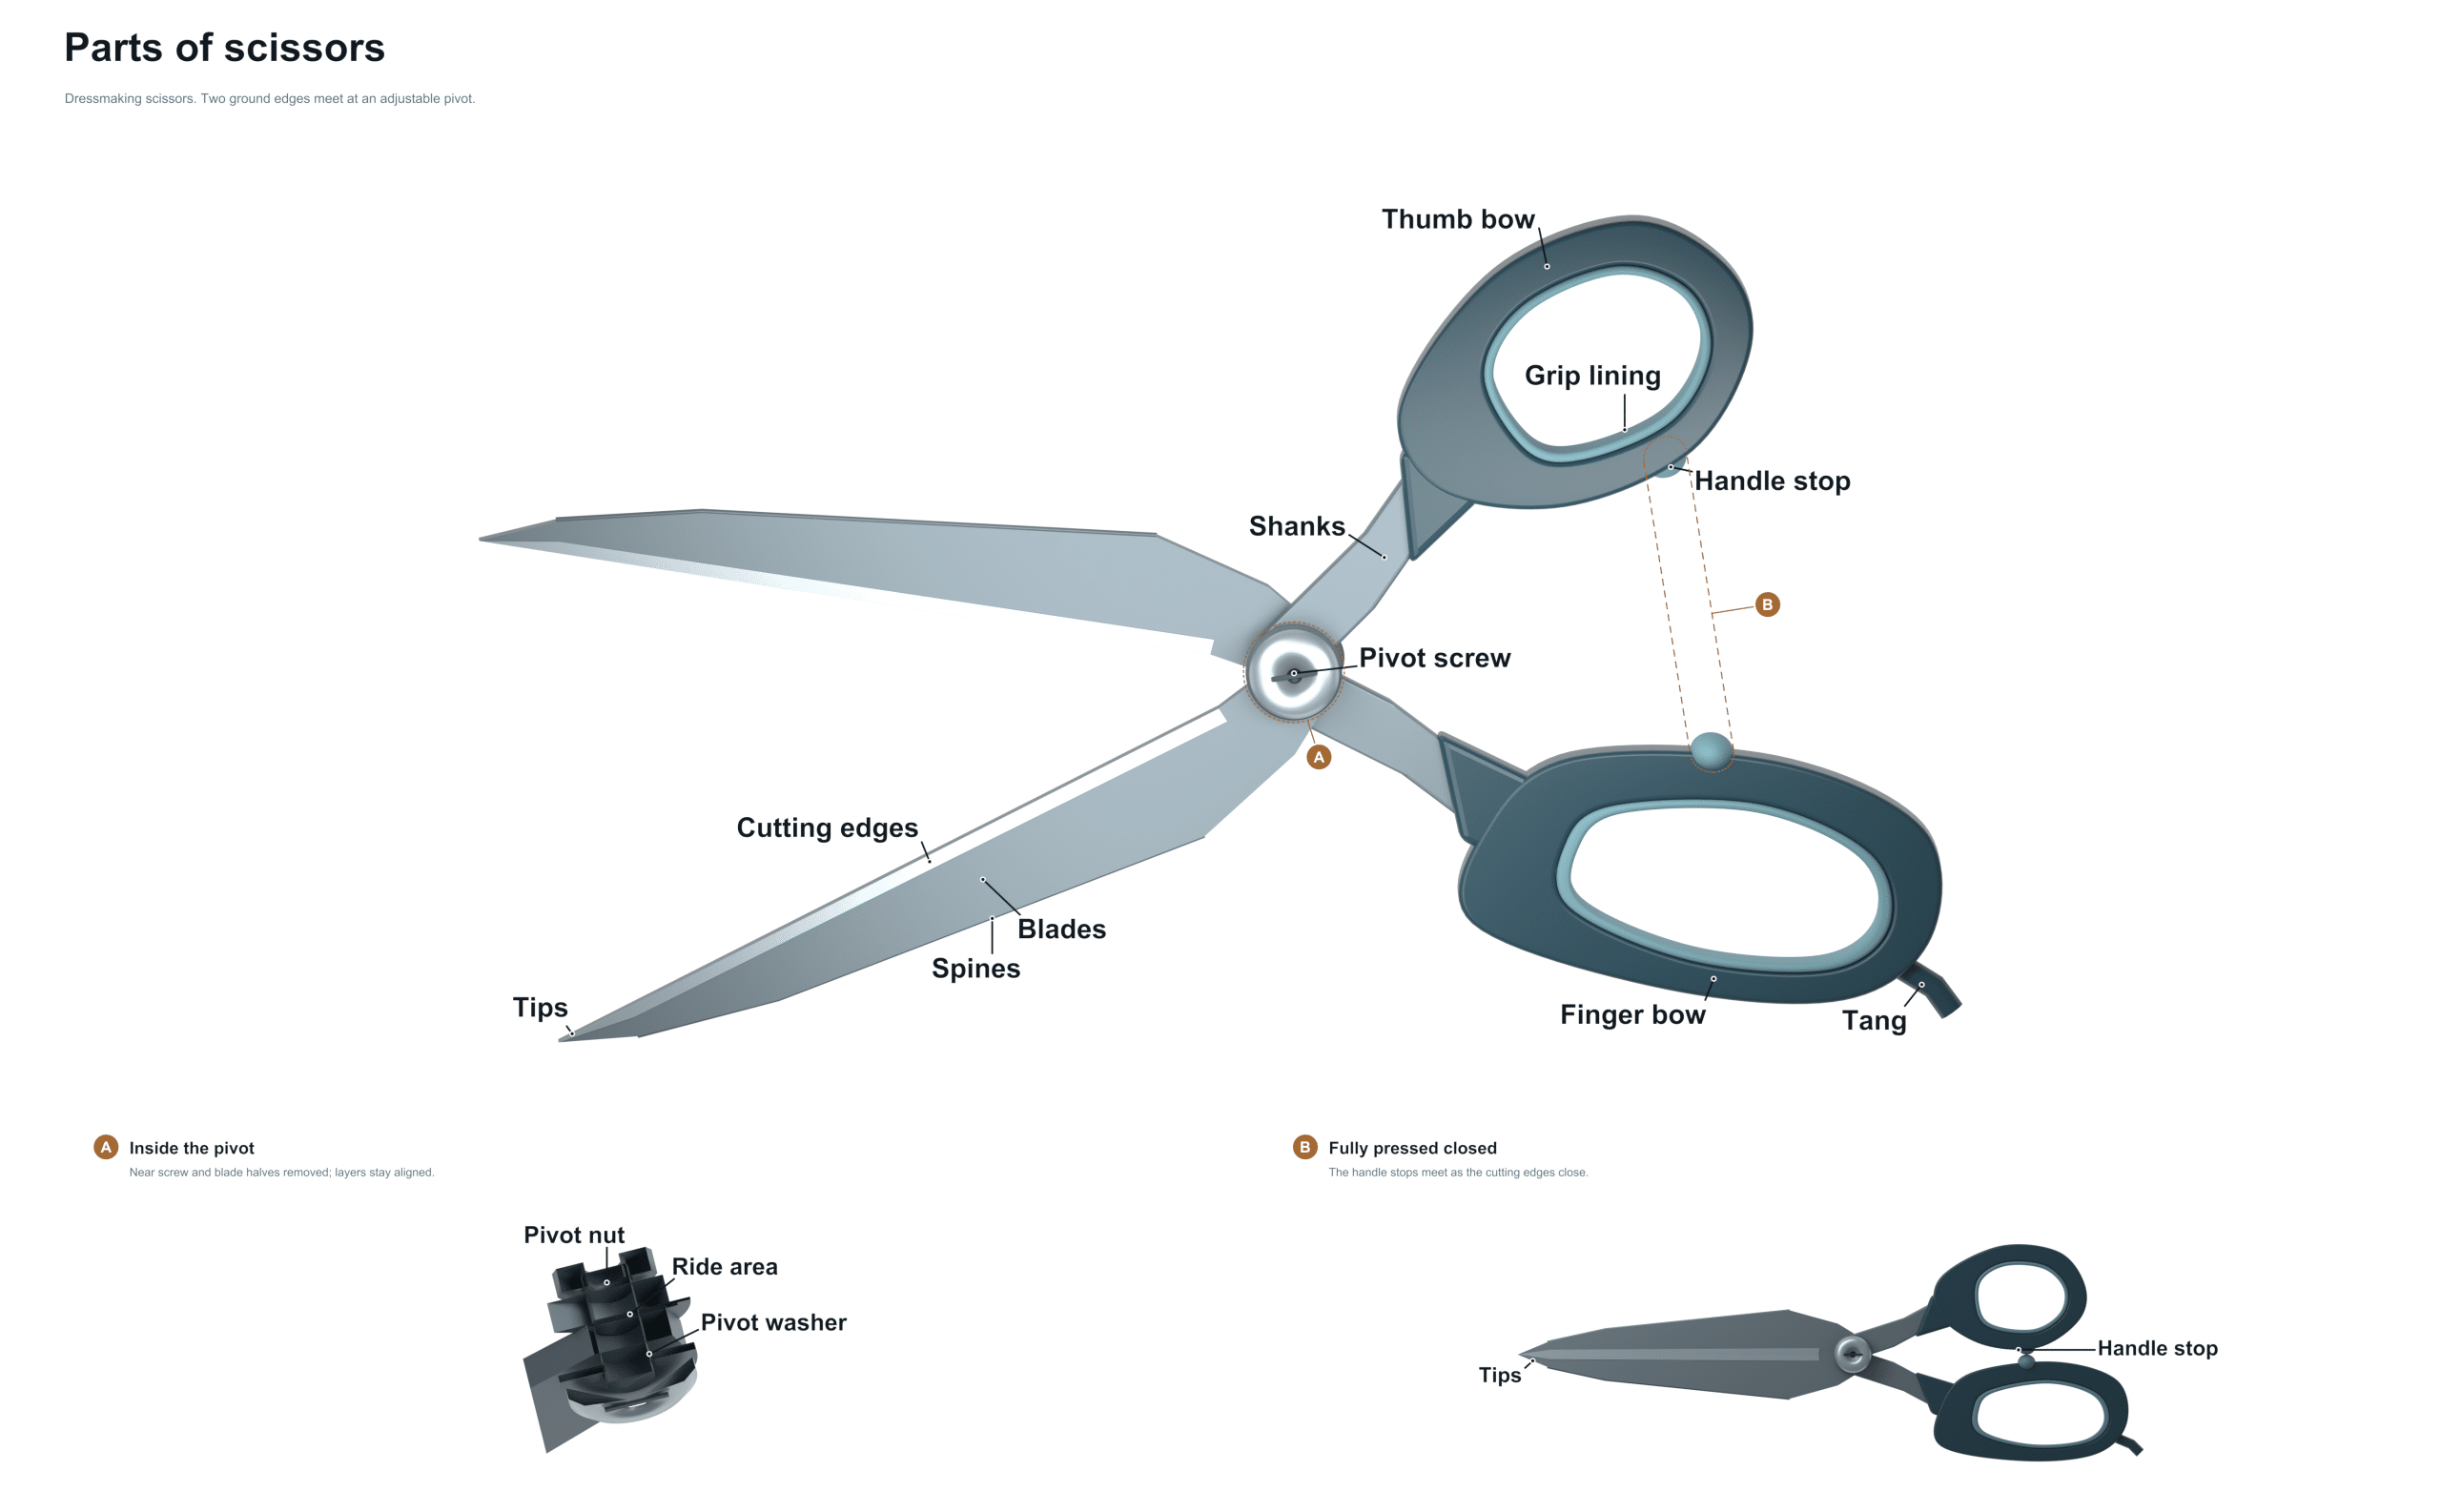
The image above illustrates the various parts of scissors. From there, you can observe how those parts come together to form a sharp cutting tool. Each numbered item below is explained. What does it do? How does it make the whole thing work?
Tip
The tip is the part of the blade that touches the material as you begin your cut. This is especially true on something like a sheet where you might want to begin in the center. You need the tip to be able to help you place the scissors exactly where you want them. It should then enter cleanly into the material. A rounded or bent up tip will make it difficult to begin your cut accurately. It can also make cutting in tight corners of detail projects more challenging.
The long flat metal sections are the blades. They go from the tip to the pivot point. Typically, these will have a smooth and polished surface. This decreases friction as the material slides between them. How far do you need to cut at a time? That is determined by blade length. If you have big sheets of fabric or paper then longer blades are best. For detailed cutting, shorter blades provides greater control. Be sure to clear any residue off the blades so that they slide easily against one another.
Cutting edge
Each blade has its inner side sharpened to a cutting edge. This is where the real shearing occurs. It doesn’t tear, but rather slices through what you cut. If kept sharp, this will give you a nice clean cut. For tailoring and other crafts, frayed edges is unsightly. Scissors aren’t made to cut everything. Trying to do so may easily chip or dull the fine cutting edge.
Pivot screw
In the middle is the pivot screw that keeps the two halves of the scissors joined together. This lets them turn relative to one another but remain attached. Often times you’ll be able to turn this screw to change how tight your blades are against each other. Tighten if the scissors is loose and floppy. Loosen slightly if they’re stiff and difficult to open.
Fulcrum
Fulcrum This is the point on the scissors that they revolve around. The pivot screw is usually this point in most scissors. It is the mechanical heart of the scissors. When you cut something it places the most stress on this point. It transfers your handle force to the blade. If debris gets ground into the metal here, it can cause premature wear or sticking. Cleaning this area keeps it clear of debris.
Shank
Part of the blade that runs from the pivot point toward the handle is called the shank. The shank connects the grip end to the cutting end. If a blade has a solid shank, it will transmit power effectively. It won’t bend or flex during use. On heavy-duty shears, the shanks tend to be beefier. They can tackle rougher materials such as thin metals and heavy fabrics.
Handle
This refers to the overall handle of the scissor, everything from the rings down to the structure around it. The handle can be coated in a soft material or shaped to fit your hand comfortabley. These enhance grip and also help prevent cold metal on your hands. Size wise, select a handle that fits comfortably in your hand. This will aid in both precision and control when using for an extended period.
In the handle there are two loops. The larger one is for your fingers and the smaller is for your thumb. This is the thumb ring. Your thumb doesn’t have as much range of motion as your fingers so that’s why it’s a bit smaller. When you position your thumb properly you can then push down easily. You don’t want the thumb ring to be too small. That will pinch and be uncomfortable. It could even cut off circulation. It should be snug but not pinch your skin.
Tang
Tang A tang is a component of the handle structure that inserts into the finger ring. The tang attaches the handle to the blade. Often in traditional scissors, the tang is simply an extension of the blade itself. It screws or is riveted into the handle material. It provides the anchor point for the force you apply with your fingers. If the tang isn’t secure, the handle will loosen up over time, making this a less safe and durable tool.
Finger ring
The larger loop in the handle is the finger ring. That’s where you place your index and middle fingers. Because they require a greater range of motion, it’s made bigger. Two fingers in this ring provide leverage to help you drive those blades through resistant material. The finger ring has a smooth interior that helps avoid irritating your skin when doing repetitive cutting tasks.
The whole thing is a system. It takes what you do with your hand and turns it into a cut. When your scissors are slow, look at how the blades align. Is the pivot screw tight? Are all these pieces in good shape? Sometimes they get out of whack and cause jagged cuts. Keeping everything clean makes the mechanism run smoothly. Oiling the pivot area occasionally can help as well.
Knowing the parts can help you diagnose little problems. That makes the scissors last longer. Taking care of them means keeping them sharp and straight. Then they’ll be there when you need them.