A padlock is a simple yet sophisticated mechanical device designed to secure gates, lockers, and chains. A padlock is a mechanical locking mechanism used to secure chains, lockers, and gates. They is made from physical parts instead of electronics and rely on engineering principles that haven’t changed in centuries.
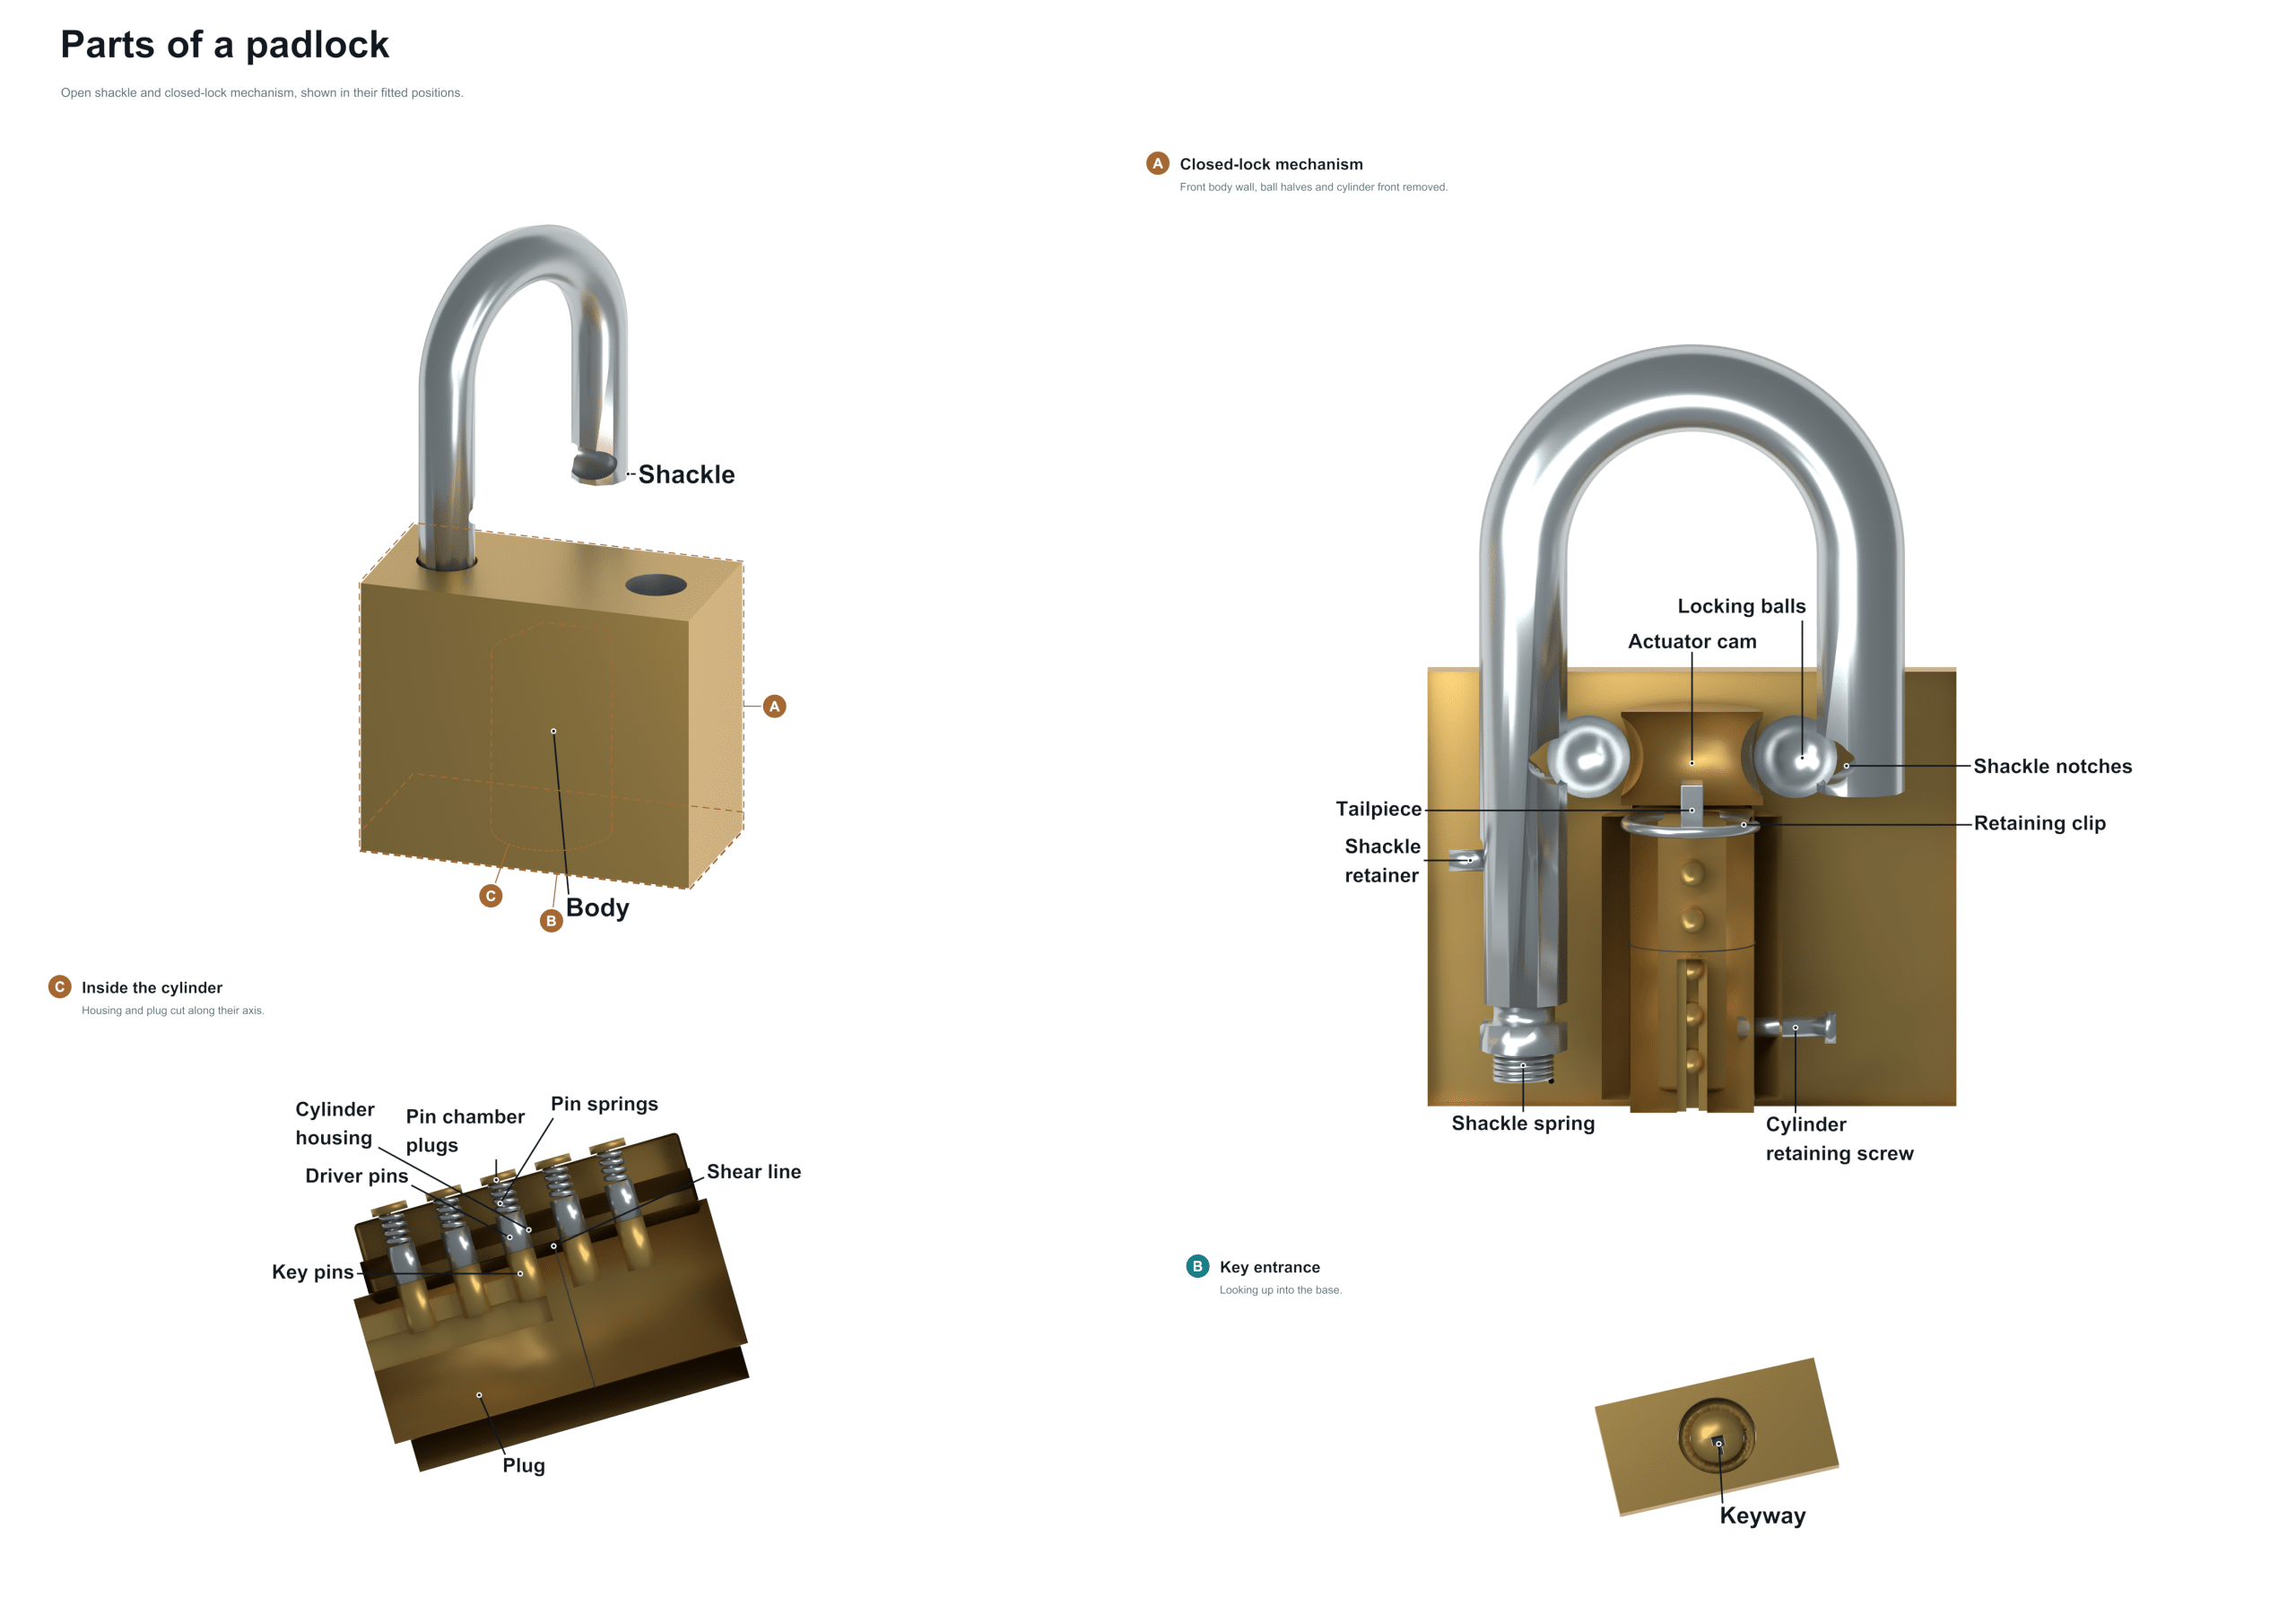
The outside of the lock is what you see. But inside there’s all these little pieces. Each part has its own purpose, like keeping the lock shut or opening it up. Using the diagram above, you’ll be able to locate each part as we explain them. We’ll begin with the parts you touch and work our way into the parts inside.
How a Padlock Works
Shackle
What you’re probably most familiar with is the shackle, that U-shaped piece of metal that hooks into a hasp or around a chain to prevent someone from accessing what’s inside without authorization. Turn the dial/key and the inner mechanism allows the loop to open. People tend to try to bend or cut the loop, so its hardness and thickness are often the determining factors in how strong your lock will be.
On a lock this would be the bottom part where the shackle connects to the rest of the lock, known as the heel. That’s where all the weight of whatever you’re securing is resting, and this point gets hammered with abuse. If something forces its way into the lock and puts too much pressure on it, that’s usually when bending and wear will begin. The joint between the two parts should move freely for the device to work best.
Heel
Heel, The lower end of the shackle is called the heel. In most designs, this end engages with the locking mechanism on the inside. There is springs and pins that lock into the toe once the lock has been engaged. Many times if a shackle is found to be loose or rattling while locked, it is an issue with the internal pieces securing the toe.
Body
The body is the main housing of the padlock, which contains all the moving components within it. The body is normaly manufactured from either hardened steel or another metal. This offers protection against water and dust and also protects against someone trying to tamper with the lock. Without a good strong body, the lock will not function properly regardless of how tight the internal pins may be.
You know it as the little slot on the front of the lock into which you insert the key. It matches the cuts in your key and only that key will displace the internal pins. Keep the keyway free of dirt; otherwise, it may not go in and turn properly. More complex keyways on some high security locks make bumping and picking more difficult.
Locking Pawl
Near the top of the shackle there’s a little lever called the locking pawl that sits inside the lock body next to the shackle. The locking pawl has a spring on it which pushes down onto the shackle holding it in place. Once the pins are properly aligned, the pawl pops back and lets go of the shackle. Sometimes the pawl can get stuck. If you turn your key and the shackle doesn’t fall, this could of the cause.
Plug
When you turn the key, the plug (the round portion) rotates. It connects to the internal mechanism that moves the locking pawl. For the lock to function properly, this plug needs to be able to rotate freely. A stiff feeling in the plug can indicate a lack of lubricant or worn out pins inside the lock.
Cylinder
The cylinder is the outer housing surrounding the plug. It contains the pin stacks and provides a fixed point for the plug to rotate around. Where the plug rotates on the cylinder is known as the shear line; this is where the lock opens. As long as the cylinder remains intact, the pins will remain in alignment while the lock is in use.
Within the cylinder are vertical columns (stacks) of pins. The plug can only turn when it’s keyed correctly; otherwise, it’s prevented by those pins. Each stack aligns at a certain height, independent of all others. Without each stack properly aligned, the plug won’t turn and the lock remains locked.
Above the shear line in every stack of pins you will notice one that is referred to as the driver or top pin. This pin is always heavier than the bottom pin. A spring exists above this top pin to force it downward. Without a key in the lock these pins prevent the plug from turning. They are very important because if they do not align exactly with the bottom pins, the lock will not open.
Driver Pin
The top pin is also referred to as the driver pin. This is the upper pin in the stack. Its main job is to block the rotation until lifted by the key blade. Force from the spring is transferred down through the driver pin to the bottom pin. If this pin wears down, the key may turn slowly or may not engage the mechanism at all.
Bottom Pin
This key blade contacts the bottom pin, also known as the key pin, and when in place will rest just below the shear line. The cuts in the key will determine how far down the cutout is placed, raising the pin up to the proper position for alignment with the driver pin. Without this pin in good shape the stack of pins won’t align and you’re locked out. You can check your pins regularly and discover those getting worn prior to failure.
Spring
In each pin stack there’s also a small coil of spring above the driver pin. This spring constantly forces down on the pins holding them in place and blocking the plug. Over time these springs can corrode and become loose causing the pins not to return properly to their place. This results in a sticky feeling or a lock that fails.
Knowing what goes into a padlock will enable you to better care for yours. The heel and locking pawl can get blocked if the shackle doesn’t pop out even though the key turns in the lock. Dirt or debris in the keyway can prevent the key from entering fully or turning smoothly. Keeping the inside pins and keyway lubricated regularly enables everything to function properly as a unit and be there when you need them most.