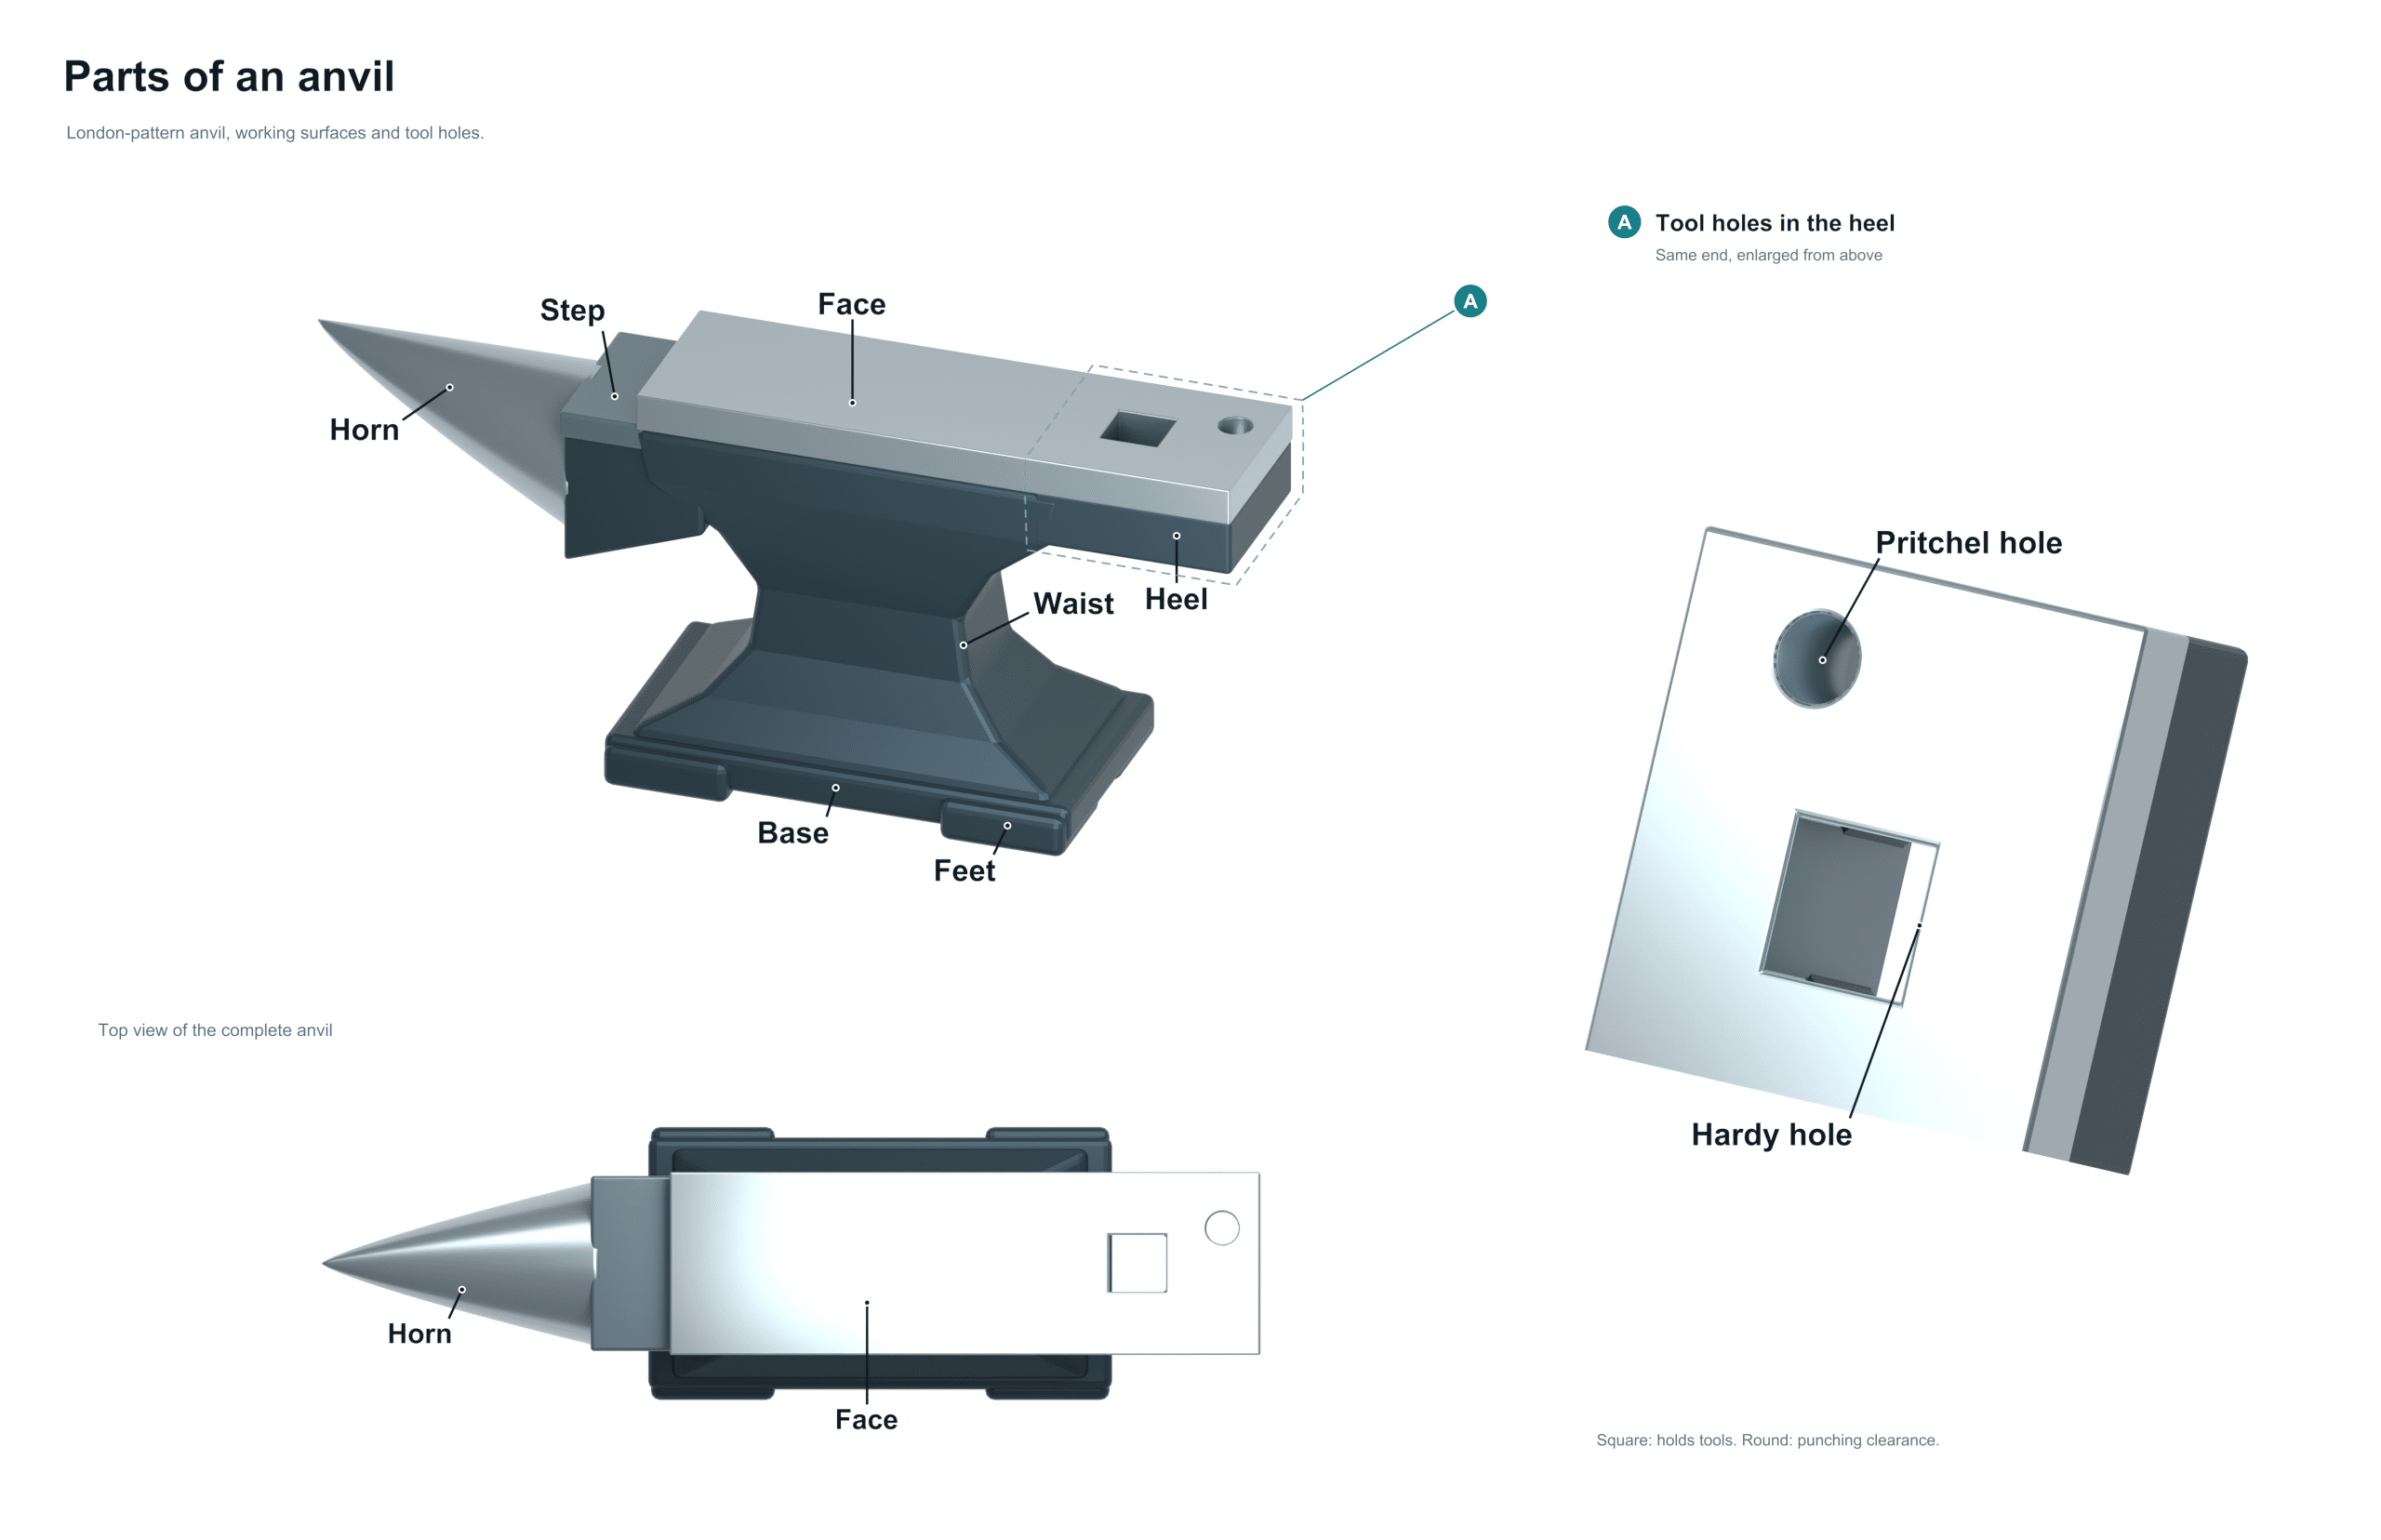
The key is that the anvil doesn’t just serve as something to hit with the hammer. It’s carefully shaped, hard and heavy. Every part of it has a purpose. Some areas is meant for cutting holes, others for bending curves, and still others for drawing out and flattening the metal.
This anvil is what’s called a London pattern anvil, and it’s probably the type of anvil you’ll encounter in a moddern day forge. The front (or horn) is pointed, the top is flat-faced and the rear is square-heeled. The body taper down below the working surface to a waist before flaring out again into a wide base. Look at each component and you’ll understand why this shape has lasted for so long.
The smith’s test for an anvil is fairly simple and fast: they’ll drop a small steel ball bearing on the face to see if it bounces most of the way back up.
The reason? A good anvil has a hard face; that bounce lets them know that the energy of every hammer blow doesn’t gets soaked up by the anvil but returns to the work.
Anvil Parts, from Horn to Feet
Face
The flat working surface running along the top is what we call the face. The face is the part where most of the hammering action occur. It’s hardened to make sure it remains flat and smooth, despite repeated years of heavy use. That’s important because any chips or dents on the face will be pressed into every piece of hot metal you work on. Smiths know this and take care not to ever hit the bare face with their hammers.
You’ll also notice that the edges of the face are rounded off in places. These softer edges allow you to set down a shoulder or bend a bar over the side without leaving a sharp cut in the metal.
Horn
As you can see in the picture above, the horn protrudes from the face of the anvil. It is a long tapered end that tapers from thick at the base to the narrowest point at the very end. This allows you to use it to create almost any type of bend you might require. If you want a tight scroll or hook, work closer to the tip of the horn. For larger curves, such as when creating a ring, you’ll move further back toward the body of the horn. There, you get a much larger curve. When you are working on something that requires a curve, you’ll find yourself reaching for the horn in practice.
Step
The step is the little lower ledge between the face and the horn. The step is left softer than the face in traditional anvils and this is not without a good reason. Here’s where smiths cut their hot metal with a chisel. When the chisel goes right through the metal, its edge lands on the softer step instead of the hardened face. This protects both the edge of your chisel and the face of the anvil.
Heel
Walking around to the rear of the anvil, you arrive at the heel, which hangs out beyond the rest of the body. That’s why there’s a place for you to tuck your work under and hold onto the edge while hammering and reaching under it with tools. Also at the heel are the two holes that make an anvil so useful…
The pritchel hole and the hardy hole.
Hardy hole
The hardy hole is a square opening that passes directly through the heel of the anvil. Hardy holes are designed for hardy tools, or tools with square shanks. Swages, bending forks, and cut-off tools are common examples. The square hole prevents the tool from turning when you’re hammering down on it. This lets you hit it down firm and rest assured that it’s going to remain in place precisely where you put it.
Pritchel hole
The other hole is a round hole next to the hardy hole. This is the pritchel hole. Its primary purpose is for punching. If you need to punch a hole in a piece of hot metal, you lay your work on top of the pritchel hole. When the punch goes all the way through, it has a place to go. What comes out of the hole is a little chunk of metal we call the slug. That just falls down through the hole. You can also hold some of the round shank small tools in there.
Waist
The body of the anvil narrows into a waist between the working top and the base. The waist connects the heavy upper portion with the bottom piece underneath it and when you hit the anvil, the weight of your hammer blow transfers through the waist and into the stand beneath it. The tapering of the waist allows the heel and horn to overlap it, providing space to work on either end of the anvil.
Base
The base runs down from the waist and is far wider than the waist. This spreads the weight of the anvil out onto a wooden block or stand called the anvil stand. It’s important that the base of the anvil is flat and wide enough so that it doesn’t rock or creep slowly around on the floor while you are hammering. An even anvil is always a safer anvil to work with.
Feet
The feet on this one are small projections sticking out from each corner of the base. These add stability to the anvil. They also provide a way to secure the anvil in place with chains, metal straps, or clamps placed over the feet to hold the anvil securely to its stand. A well-fixed-down anvil feels more solid under the hammer and tends to ring less.
When purchasing a second-hand anvil, some simple checks are worth making. Look carefully around the edges of the face for any chips and try the ball bearing test to determine how well it rebounds. The middle of the face may have become worn in a dip over the years which is worth checking too. A slightly rough face can normaly be cleaned up but a badly sagging or cracked face is a far bigger problem to put right. You should of checked the hardness too.