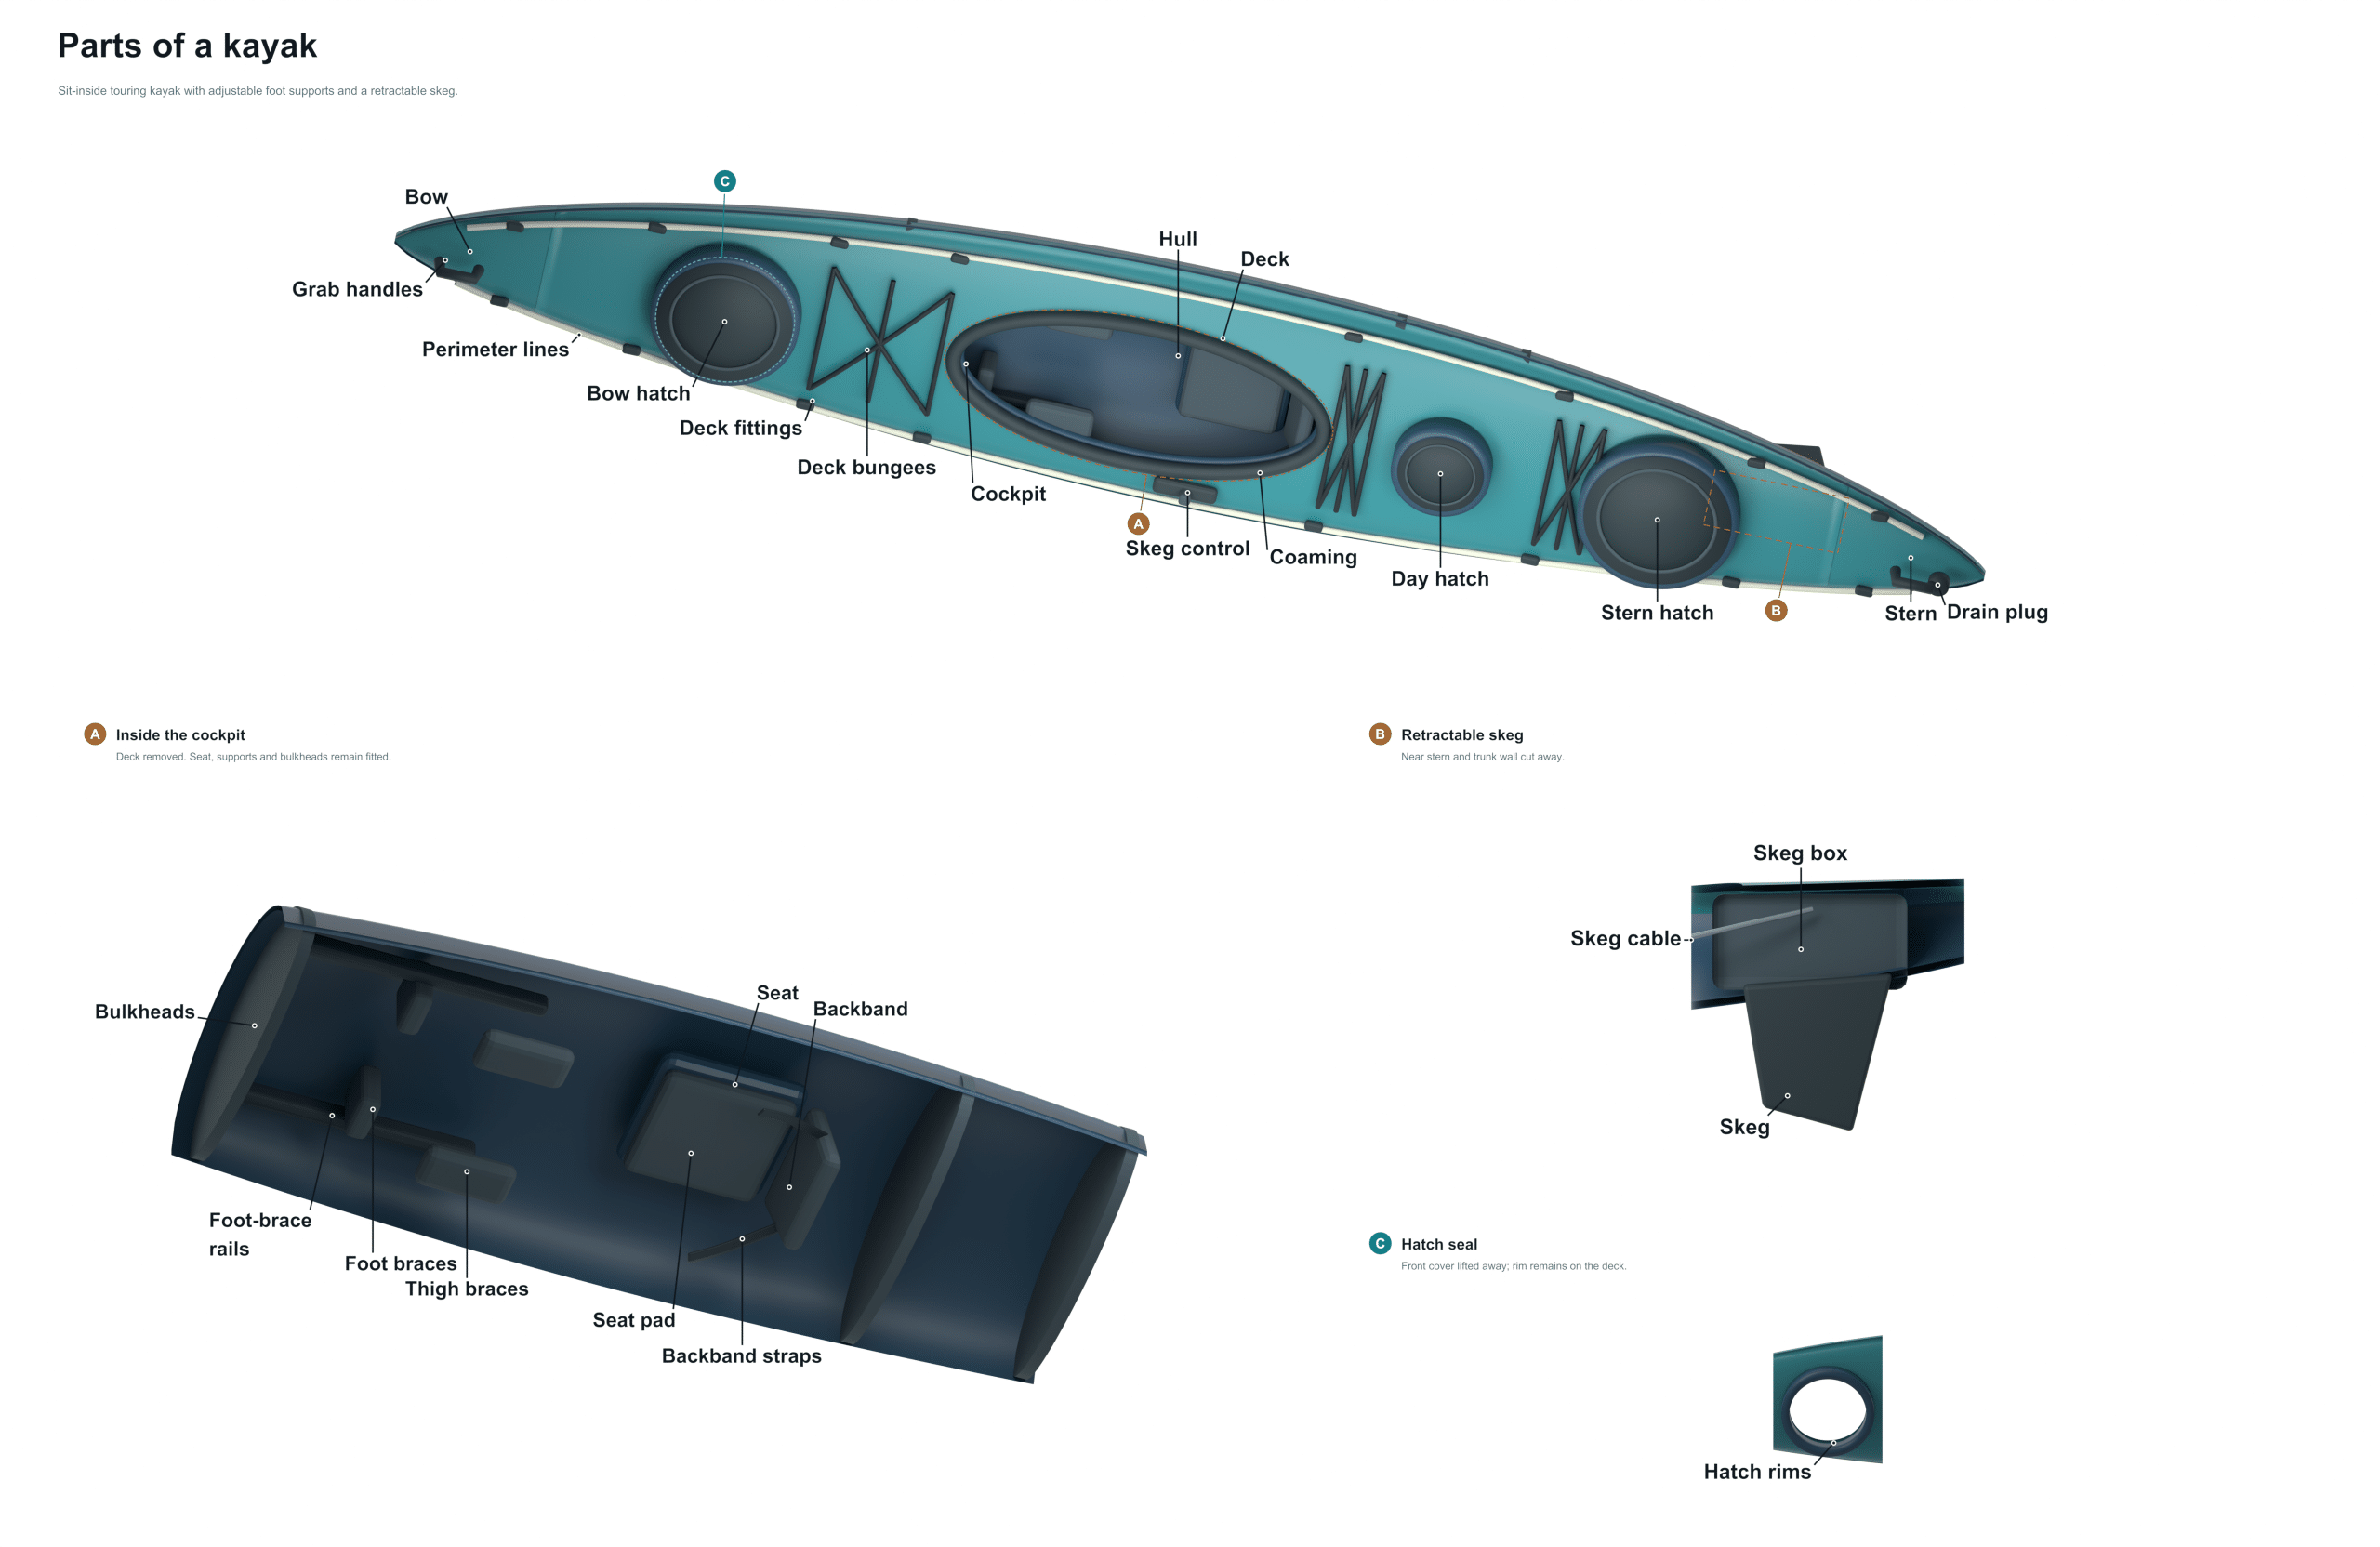
Learning the parts of your kayak not only makes you a safer and more confident paddler but it also lets you understand what your boat will do when conditions change from flat water to current. Knowing your equipment help you plan for performance and make decisions while out on the water. Below is a description of the components in the diagram above. With this information, you’ll be able to talk shop with other kayakers and keep your rig in shape.
The Bow is the pointy end of your kayak that is intended to slice through the water as efficient as possible. How does the bow shape relate to how the kayak handles waves and tracks (stays on course) in a straight line? Generally speaking, the longer and sharper the bow the better it will track and go fast. The shorter and blunter it is, the more maneuverable it will be in tight quarters.
The Parts of a Kayak
Grab Handle
This is the grab handle. Moving forward and looking along the top surface you’ll notice the Grab Handle. This is usually a strong piece of plastic or tough fabric sewn/molded into the deck. It’s used when rolling the kayak on to the shore from the water or lifting it onto the roof of your car. Be sure to inspect this handle frequent as any weakness here can be very serious. The whole boat rest on this handle when being transported.
Hatch
The hatch is under the deck and is also watertight. The lid closes securely to protect contents from getting wet. Use the hatch to store things such as emergency supplies, first aid kits, clothes etc. When you pack it in, ensure there’s no debris on the hatch seal so water doesn’t seep into the compartment.
Bungee Deck Rigging
The Bungee Deck Rigging runs across the top surface near the hatch. The bungee cord give you a place to put things that you want quick access to. It could be a spray skirt, a dry bag, or even just a water bottle. It keeps your stuff in one spot so you don’t have to open up the hatches to secure it. And you can move the attachment point to adjust how tight they are. That way if they loosen over time, you can make them tighter again.
Cockpit
The cockpit is the hole in the deck where you step into the kayak, put your legs in, and sit. How easily you can get in/out of a kayak depends on the shape/size of the cockpit. It will also impact your sense of security when paddling. A wider cockpit make it easier if you are just starting out. If you want to be warmer/stable, go with a narrower cockpit.
Deck
The deck is the top of the kayak, which is the “roof” of the boat. The deck holds your gear in place. The deck also gives buoyancy to the kayak, so it will float if it overturns. Maintain a clear deck by keeping it free from sand or rocks. If you capsize and roll back on top of the kayak, these items will scratch the hull.
Stern
You move back to the back of the boat which is known as the Stern. The stern is the back end of the kayak. Depending on the model it can be similar to the bow or not. It affects how the kayak respond to your controls. It also affects how it rises and falls in the water as a wave passes under it.
Skeg / Rudder
The Rudder or Skeg is located on the bottom at the back of the kayak. The rudder is similar to a fin that comes off the hull and goes down into the water. It assist the kayak in tracking straight when there are strong currents or wind blowing. Some have an adjustable rudder and some a fixed one that is adjusted from within the boat. You can control a rudder with your feet using a foot pedal. This part is essential if you want to keep going straight without constantly having to correct while paddling.
Seat
It is the seat. The seat is a padded area that fits snugly at the bottom of the cockpit. It helps hold your hips and lower back in place. Your seat should fit well and distribute weight evenly. That will help prevent fatigue during long trips. Most seats offer straps or an adjustable back rest to give extra support and ensure you stay in place on rough water.
Hull
The hull is the bottom exterior surface of the kayak that comes into direct contact with the water. The hull shape affect the tracking ability, stability and speed of a kayak. Primary stability comes from a flat hull which provides a steady feeling at rest. Secondary stability comes from a rounded hull which help the boat feel secure while leaning over.
Foot Braces
Lastly, underneath your feet in the cockpit you’ll find the Foot Braces. They are adjustable platforms where you can stretch out your legs. It helps you use your core muscles to improve your paddling technique. Adjusted correctly, you shouldn’t be over extended or cramped up. That’s how you get the most comfort and efficiency of your power transfer.
All this together makes a complete package. It is a way to get around on the water easily and safely. The hull should of been checked regularly for any cracking. The rigging should be checked for elasticity and the hatches for how well they seal. Maintaining your kayak in top shape is important. Understanding how the foot braces connect to the skeg helps you appreciate the engineering behind your vessel. You also know that the deck supports the hatch. These are the places to inspect if things seem amiss. The foot brace may be loose; this will impact your stroke. Maybe a skeg became misaligned and is causing you to drift. Once you learn what each component does and how it’s labeled, you’ll take control of your kayak as its pilot. You’ll know how to respond in new scenarios and ensure every trip goes smoothly and easy.