The anchor is a vital piece of marine equipment used to secure a vessel to the seabed. What does this mean? It means the anchor hold the boat in place resisting the forces of waves, current and wind. Without an anchor, the boat could run off course.
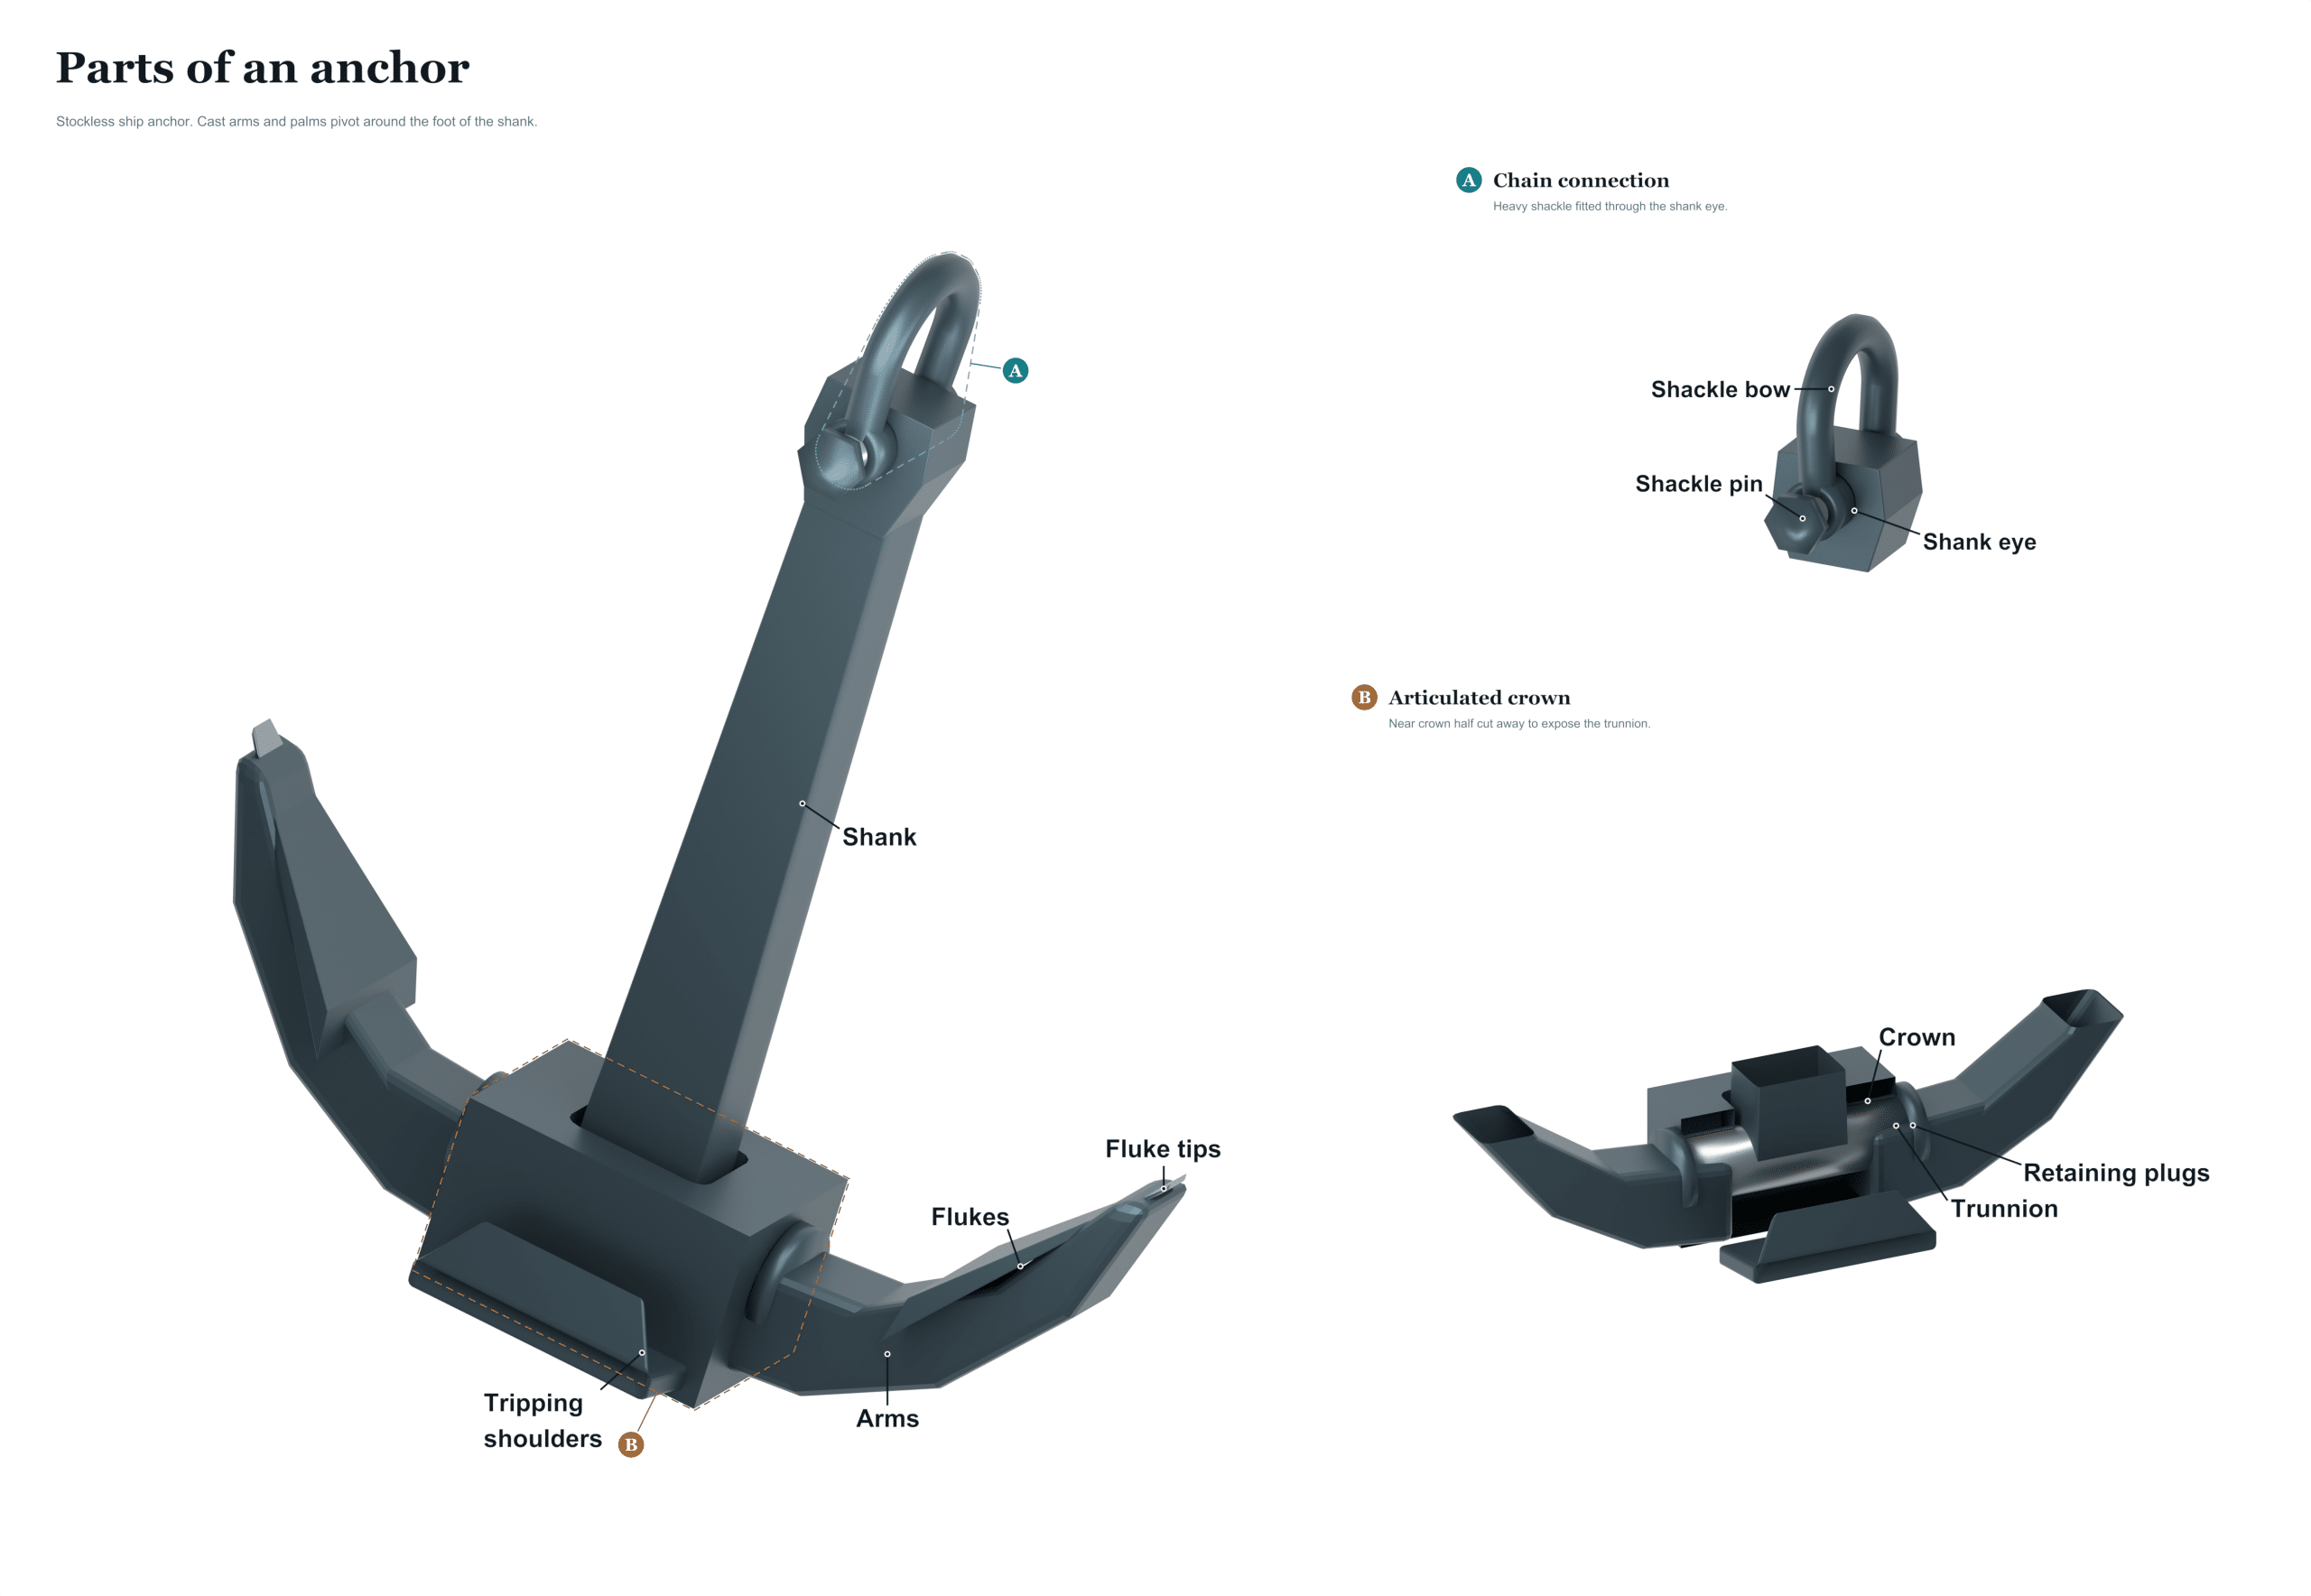
Knowing how the anchor works can help you know what type is best suited for your needs but more important how to take care of it. We’ll break down the parts of an anchor below to understand its anatomy better. Below is a diagram you can reference and match up as we go through each item. Knowing the physical shape of things by matching up their names visually is important when understanding the technical names of anchors.
Parts of an Anchor
Ring
The top of the assembly have a little loop on it (the ring). It attaches the anchor rode, which is the chain or rope that connects the anchor to your boat. To connect your line, simply attach a quick link or a shackle through the ring. When you drop your anchor, this is where the first load is taken so check this frequently for any signs of stretching or corrosion. The smoother the ring is, the better hold it will have when there’s weight on it.
Shackle
The shackle is the U-shaped metal piece that connects the ring to the shank. The shackle is a U shaped metal item with a pin through the open end. It creates a sure connection that can also be released when necessary. Some shackles is made to pivot which makes them great at preventing twisted line when fished hard. Make sure the pin is locked in place and if your design has a moving shackle ensure it rotates freely. A rigid shackle can cause undue stress on all components of this part of the lure.
Stock
The stock is a crossbar that extends horizontally from the shank. It maintains the orientation of the flukes. When you pull on the line with your anchor, you want the flukes digging into the bottom. For this reason, the stock is critical in adding leverage. In more recent designs the stock is fused into the shank, but on older anchors, the stock is removable. If it’s cracked or bent, it will inhibit proper anchoring.
Shank
The backbone of the anchor is its shank, which is the long shaft running from the crown to the ring. Scrutinize it for any signs of pitting and deep scratches all the way down its length. This can be an indicator of serious corrosion or metal fatigue. When you pull on your anchor, you want the force being transferred from your boat to the flukes. For this reason the shank should runs straight.
Fluke
A big fluke with sharp edges gets the anchor down initially and then keeps it planted because it has a wider surface area than most blades. The fluke digs into the bottom (whether it’s clay), mud or sand… And really does the work on this anchor. Fluke shapes vary depending on their sizes and they’re good for various bottom types. If you keep your flukes sharp and clean, you’ll get the best performance from them.
Bill
When you place your fluke on the bottom, the bill is the first thing that hits the bottom. It’s a pointed tip at the end of the fluke and is designed to begin digging into the bottom with little effort. Worn out or bent bills can cause the anchor to slide rather than embed in the bottom. This is the part of the anchor that gets hit the hardest when deploying so regular checks is necessary.
Arm
This supports the structure, which is the connection between the main body and the arm that connects to the fluke. This is essential to transmit pulling power from the shank to the fluke while helping keep the fluke at the proper angle to dig. Some arms hinge so the fluke swings out for better penetration. Is there any sign of deformation or stress around the joint?
Palm
The flat surface refers to the palm, which is part of the fluke. Once deployed, the fluke sits on the bottom and resists movement. In softer bottoms, a bigger palm usually equates to greater hold. Depending on the anchor style, the palm may be rounder (for increased hooking) or flatter. Check to see if any debris or marine growth has adhered to the palm, as it will weaken anchoring performance.
Crown
From the shank, the digging portion consists of the arms and the crown or the top part, which is at the intersection of all three components. The crown should not have any cracks because that’s where twisting force is generated when the anchor digs into the ground. Particularly if you’ve fished around rocks, examine the crown carefully. On certain anchor models, the crown ties together with the heel as one solid piece.
Throat
Above the crown on the shank, you’ll find what’s called the throat… The curved part that takes a lot of abuse during the loading process from the anchor. You want a smooth rounded throat because it spreads the forces uniformly. Look at the throat for any wear patterns or thinning; these may be points of concentration that could weaken the structure.
Heel
The heel refers to the back end of your fluke (where the arm connects) that rotates when you pull on the anchor to help the fluke dig deeper. If an anchor pulls out for some reason the heel angle affects how readily it will reset. Ensure the flukes remain clean and sharp for best digging action.
All of this forms an effective anchor hold system. The weight and design lead the anchor into the bottom when lowered and then the rode holds tension on the flukes as they dig even further in. So if you feel like your anchor is not secure, inspecting all the components for wear and tear will give you confidence that all are working as designed. This keeps your boat secure and in place.