
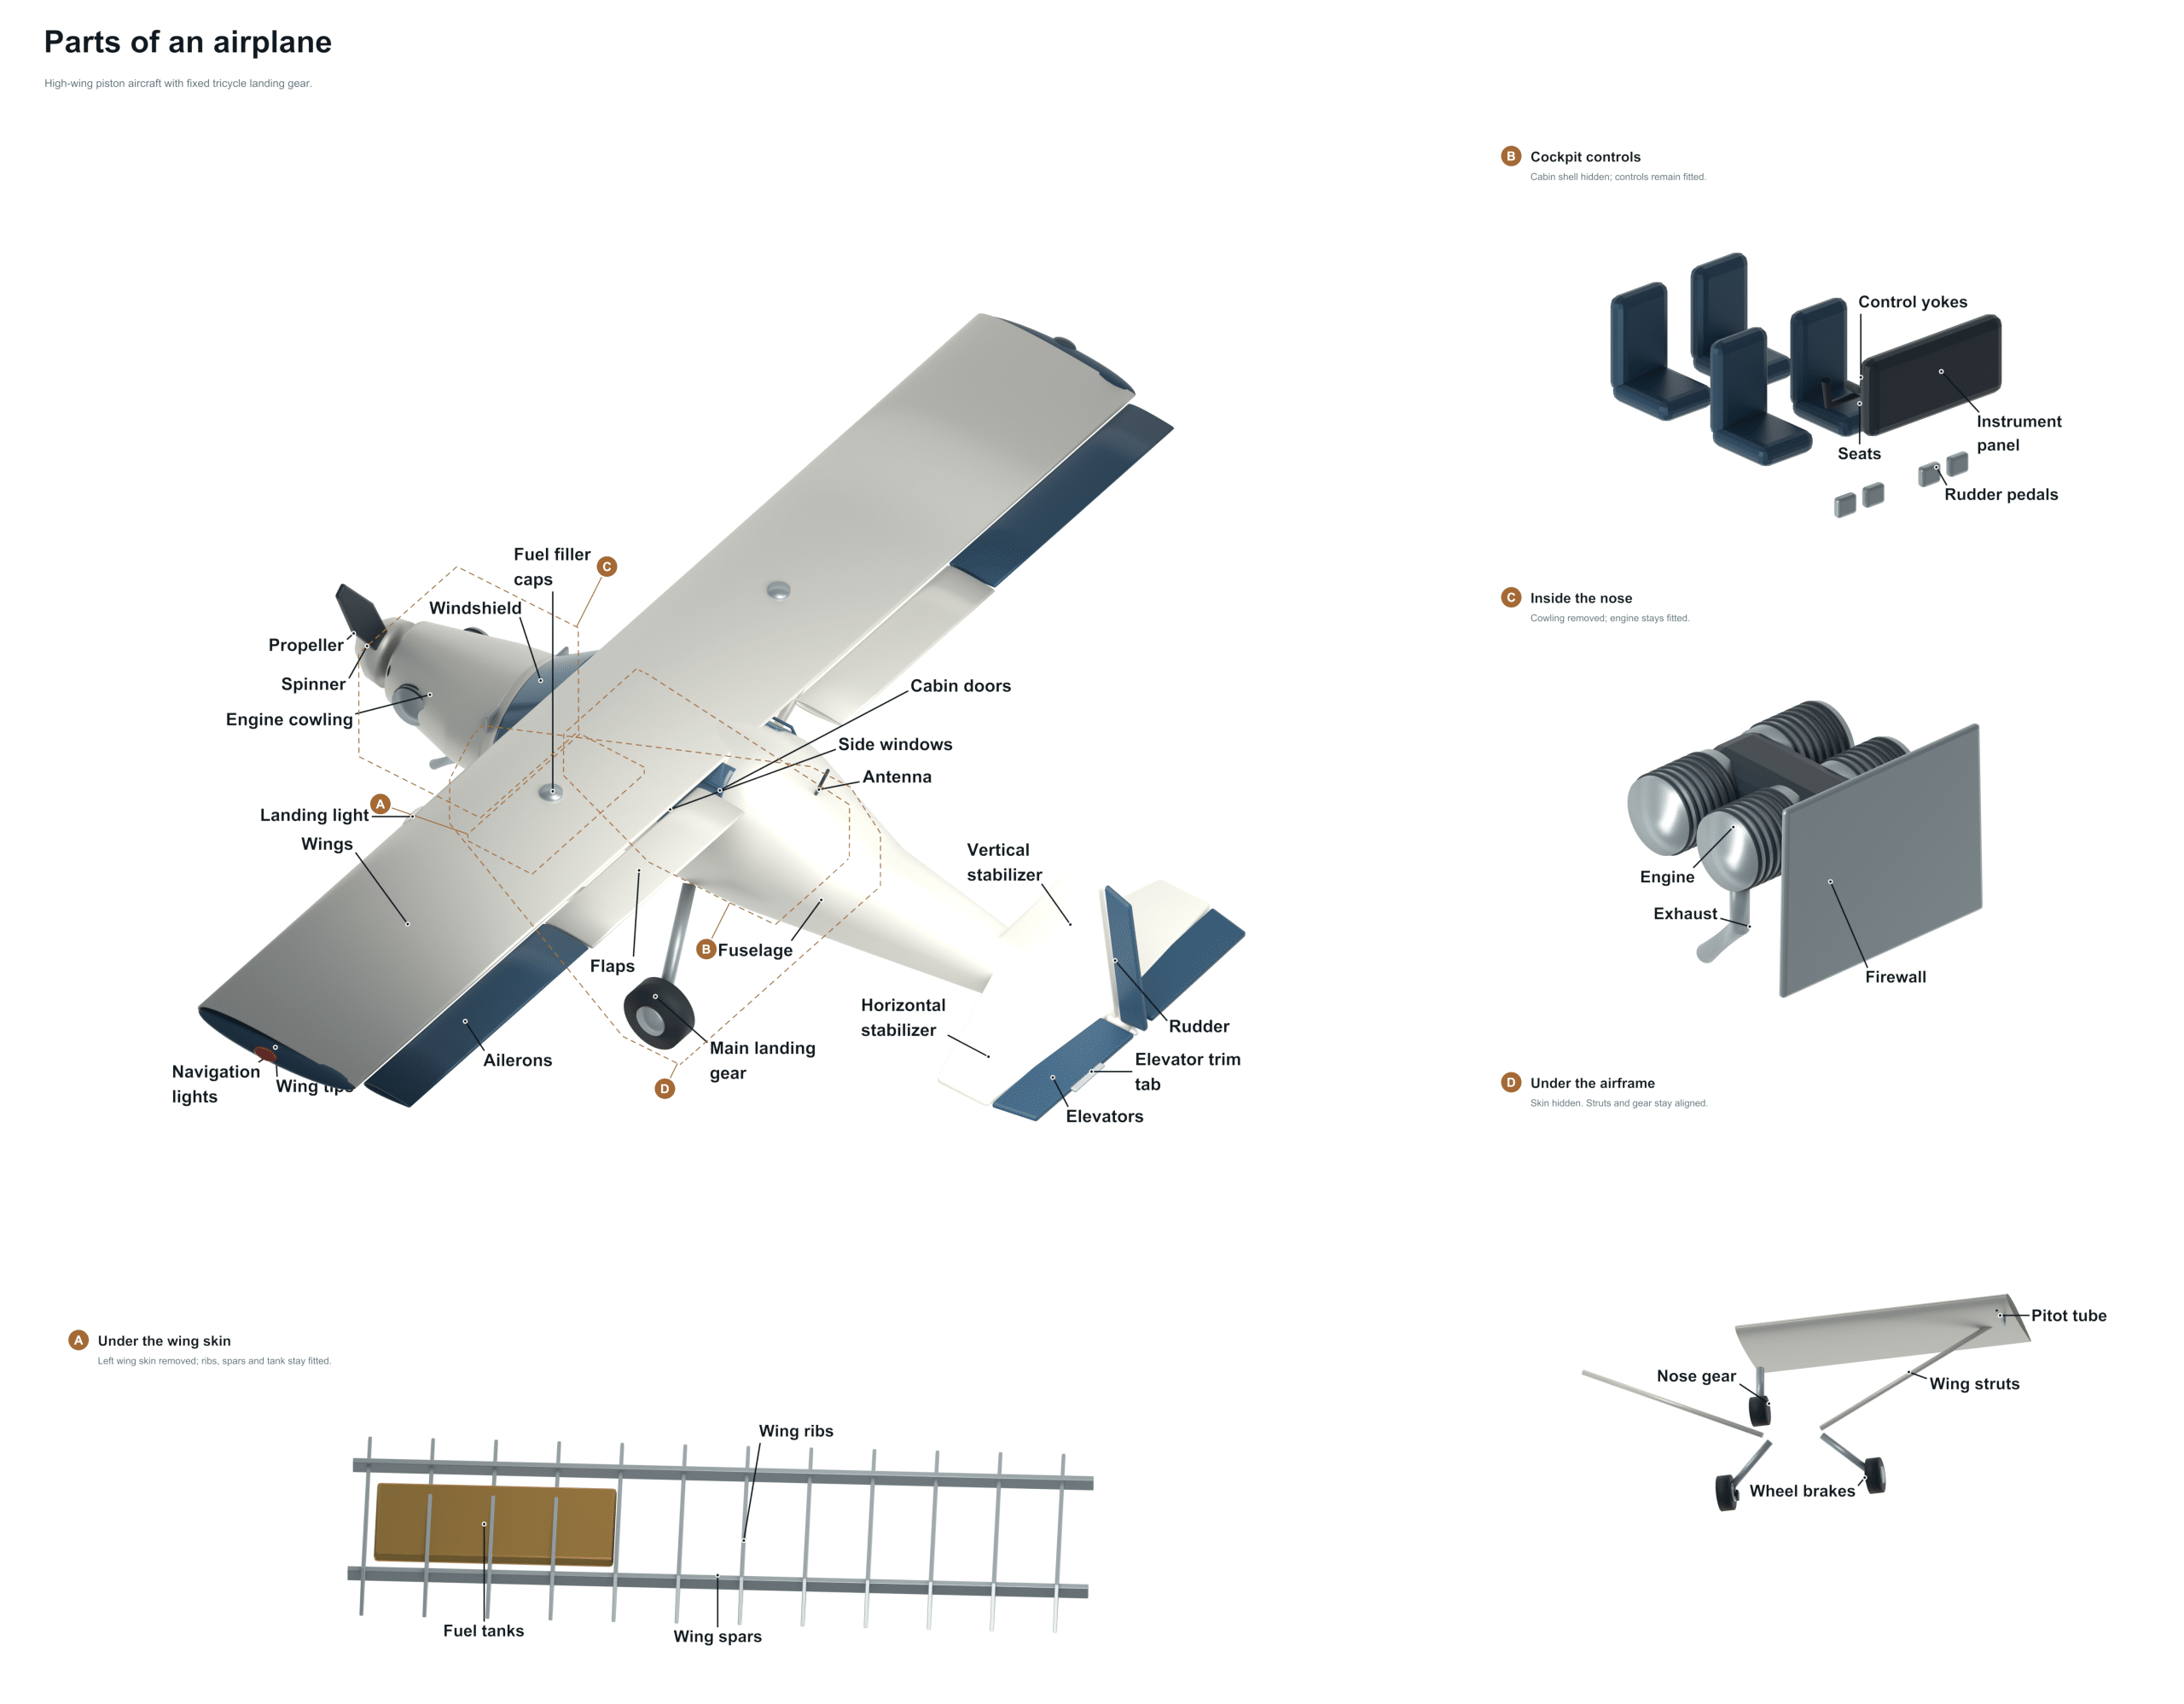
Before each flight pilots walk around their little airplane and inspect all the caps, hinges, and panels on it. They do this from front to back and piece by piece to learn the name of every part early on. Understanding what all the stuff is lets you understand how the plane flies, turns, and lands.
Here we see a high-wing, single-engine piston airplane with fixed tricycle landing gear. You’ll notice that this arrangement is typical for training aircraft. A propeller in the nose is driven by a horizontally opposed piston engine. The wing spans the width of the cabin above you. All three wheels is down throughout the flight. Its simple but forgiving design makes it popular with flying schools.
Three views also allow you to explore inside to see what’s under the skin. The engine compartment view lifts the cowling straight up so you can see the engine, firewall and exhaust in there installed positions. The wing structure view will remove the top skin to expose the ribs, spars and fuel tanks. The cabin section view will open a side of the fuselage to expose the instrument panel, seats, yokes and pedals.
Airplane Parts, Nose to Tail
Fuselage
The fuselage: The long, streamlined part of the airplane extending from the nose to the tail. This is where you’ll find the pilot, passengers and baggage, as well as where all the components is joined together: wings, tail surfaces, landing gear. Because it tapers down, this design decreases drag, which means the engine doesn’t have to work as hard to push the plane along. When doing a walk-around, keep an eye out for any wrinkles or dents in the skin, since they can compromise the frame.
Engine cowling
This refers to the shaped piece of metal that surrounds the engine in the nose called an engine cowling. This gives the nose a smooth shape but more importantly guides cooling air over the hot cylinders. Without this airflow, an air-cooled engine will not work and the cowling has to fit correctly with clear inlets. The inlets can become favourite places for birds to nest, which you should check with a torch before flying.
Windshield
The windshield is a large curved pane at the front of the cockpit. You need to be able to see out of this and line up on the runway and see other traffic. Windshields are made from acrylic which scratches easily. Use a soft cloth and water to clean. Don’t wipe with a dry rag or paper towel as you’ll just leave fine scratches that glare in the sun. Acrylic is used for most windshields in light aircraft.
Side windows
The side windows allow daylight in and give all passengers a view. These are critical for the pilot as the airfield circuit is frequently to one side together with other aircraft. A good downward view is provided by the high wing position. It is worth noting that when you turn a corner the wing will block your view in that direction and pilots regularly lift their wing up momentarily to check before banking.
Cabin doors
The plane has cabin doors on both sides. Each door wraps around its side window and is held shut by a latch and handle. If not closed correctly, the door will pop open in flight, alarming but usually not dangerous. The danger lies in the distraction this causes the pilot who tries to close the door. Before the take-off run, be sure to firmly check all latches.
Wings
Most of the lift required to keep the aircraft airborne is generated by the wings. These are positioned right across the top of the cabin, which is why the type gets its name. Placing them like this ensures they remain off the ground when operating from rough strips.
The wings have an aerofoil, or curved cross-section. When moving forwards, the wing produces lift as the air pressure under the wing remains higher then over the top.
Wing tips
At the far end of each wing is a rounded cap known as the wing tip. This completes the wing structure and gives it its shape for how air flows from underneath to above. Spilling air creates a vortex that contributes to drag, so wing tip shape matter a little bit. The tips also bear red and green navigation lights. If you miscalculate a turn, they’re the first thing to get clipped by a hangar door.
Ailerons
Located on the rear of the wings near the outside ends are hinged surfaces called ailerons. They always move in opposite directions. One moves down and one moves up. By raising or lowering an aileron, the wing increases its lift and causes the airplane to roll. If you turn your yoke to the left, the left wing lowers (left aileron goes up). To ensure they swing freely, pilots manually move both ailerons during their walk-around.
Flaps
Both flaps move downward together, but unlike ailerons, they are positioned on the inner portion of each trailing edge nearer the fuselage. The flaps increase drag and lift simultaneously. Consequently, the aircraft is able to descend steeply while maintaining its airspeed. This is useful on short runways. It can also fly slower. There is a maximum speed at which you should lower flaps. This is shown as a white arc on the airspeed indicator. If flaps are lowered at too high a speed, they will overstress the structure.
Wing struts
The wing struts are angled braces running from the underside of the wing to the lower part of the fuselage. As the wings flex upward in flight they carry a good portion of the load. The advantage is the ability for the wing to be lighter than if it had to support itself alone. The downside is added drag, but that’s fine on a slow training plane.
Wing spars
Each wing has one or more Wing spars which are strong beams running out from the root of the wing to the tip. These carry the main bending loads created by the lift produced by the wings. In the wing structure view, you will be able to see these as long members. Corrosion or damage to a spar is serious as this may cause the aircraft to be grounded while it is inspected and repaired.
Wing ribs
At regular intervals along the length of the spar there are shaped frames called wing ribs which cross over it. These are cut to the aerofoil shape and support the outer skin in the right curve. The ribs also transfer the air loads through the skin and back into the spars. The combination of spars and ribs make the wing both light and strong, like a light weight skeleton.
Fuel tanks
Each wing contains a sealed container called a fuel tank positioned inside the inboard section of the wing. The tanks are located near the fuselage, keeping the weight relatively central to the aircraft’s center of gravity. As fuel is consumed, the balance does not change significantly. On a high-wing airplane, gravity assists in feeding fuel down to the engine. Before their initial flight, pilots will drain a small sample from both tanks to test for water. Water sinks to the bottom and can shut down an engine.
Fuel filler caps
Each wing tank has a small round closure called a fuel filler cap atop it. These are typically located high enough to require a ladder or step. Air flows smoothly across the wing where the cap sits flush. Both caps should be locked down snugly before takeoff; if they are not, low pressure will draw fuel out of a loose cap.
Pitot tube
The other instrument worth knowing about is the pitot tube located just below the left wing in a little tube facing forward. As the aircraft travels through the air, the air hitting the front of the tube forces its way inside and pushes the airspeed indicator. The problem is that if the opening clogs then the instrument will not read correctly. There is also a brightly coloured cover placed over it on the ground to prevent insects from entering and you need to take this off before flight.
At night, other pilots can tell what direction an airplane is pointed by looking for its navigation lights. One is white shining out of the back, another is green on the right wing tip, and one is red on the left. So if you spot an aircraft with a green light on your left and a red one on your right, it’s coming toward you. The same color scheme applies to ships.
Landing light
The leading edge of the wing has a landing light set into it. This illuminates the runway when taking off or landing at night. During the day, many pilots leave it switched on around busier airfields as it makes spotting the aircraft much easier with a bright light. You check this during the walk-around as bulbs can fail unexpectedly.
Horizontal stabilizer
A small fixed wing at the back of the plane is called the horizontal stabilizer. This prevents the nose from pitching up and down by itself. Usually, it balances out the heavy engine at the front with a slight push downward. Without it, the plane would be hard to keep level.
Elevators
The elevator is hinged on the rear of the horizontal stabilizer. It controls pitch. Pulling the yoke back raises the elevators, pushing the tail down and raising the nose. Pushing forward does the reverse. The pilots use it to raise and lower the aircraft. And it controls speed as well because a small change in pitch quickly alters how fast the plane will fly. During pre-flight you check that they move fully.
Vertical stabilizer
At the tail end of the plane is the fin (vertical stabilizer). This keeps the nose of the plane facing into the air flow rather than swinging from side to side. Without a little fin, the plane will wander, particularly in turbulent air. Many planes have a beacon light near the top and it carries the rudder along its back edge.
Rudder
Back of the fin is where the rudder hangs from. To turn the plane left or right you use your feet on the rudder pedals to make the rudder swing left and right. This balances out turns in flight. It helps you keep a straight line on the runway, particularly when landing into a crosswind on the ground.
Elevator trim tab
Trim tabs are little adjustable tabs on elevators. On an airplane, you want to fly with no hands on the yoke. That means it’s trimmed. The trim tab deflects in the air flow and pushes the elevator up or down slightly. It nudges it into a different position. On longer flights, proper trimming minimizes the work on your part.
Main landing gear
The primary landing gear consists of two legs that are sprung under the cabin. At their feet they have a wheel. On the ground these carry most of the load and absorb landing shock. The gear is fixed; it remains down throughout the flight. That results in some loss of speed but no chance of mechanical failure. Check the legs for cracks and the tires for pressure and wear.
Nose gear
The nose gear is a single wheel mounted on a shock strut. The shock cushion absorbs bumps when taxiing and supports the nose. The wheel is attached to the rudder pedals to steer the airplane. Combined with the main wheels, the undercarriage is a tricycle configuration that keeps the airplane level on the ground. When touching down, pilots attempt to keep the nose wheel off the ground as the main wheels absorb the impact.
Wheel brakes
The main wheels have wheel brakes which are disc units. These are called calipers that squeeze a disc to slow down the wheel. They are used when running up engines, on touchdown and when taxiing. To engage them press the top of each rudder pedal with your toes. The brakes are independent for each side. This allows you to make tight turns using just a touch of the left or right brake.
Propeller
The propeller is located at the front of the nose and consists of two blades that are actually little wings. Air is thrown back by each blade pulling the airplane forward. Because the tip of the blade travels faster than the root, there is a twist to the blade. Even with the engine off, you should consider the propeller to be alive. Never stand in its arc. A blade may move enough to cause the engine to fire even if the switch is bad.
Spinner
The spinner is a pointy conical shape above the prop. It conceals the prop’s hub and bolts while directing airflow to the inlets in the cowling. Pilots check spinners for cracks or looseness by wiggling it. It provides a sleek nose appearance.
Engine
Inside the nose is the engine, which is a horizontally opposed piston unit. That means its cylinders lie flat with one on each side of the crankshaft. The advantage is that it makes the engine both short and low. Fuel and air burn in these engines to turn the propeller directly. They’re typically air-cooled and have two separate ignition systems, meaning they won’t stop if one fails.
Firewall
Between the cabin and the engine bay is a metal bulkhead called the firewall. This is designed to prevent fire, fumes and heat from entering the cabin. It is usually constructed of stainless steel. Cable holes are sealed well and it can be a solid mount for the engine frame.
Exhaust
The exhaust is a metal pipe through which the hot gases exit the engine. To avoid fumes in the cabin, it exits under the cowling. Often there’s a shroud around the exhaust, which warms the fresh air used by the cabin heater. If the exhaust is cracked, it can leak carbon monoxide into the cabin. It is a good idea to have a detector installed in the cockpit.
Instrument panel
Ahead of the seats in the cockpit is the instrument panel, or dashboard. On it are the engine gauges, flight instruments, radios, navigation equipment etc. In the layout shown here, the six primary flight instruments are arranged in their typical way so that they can be quickly scanned from left to right. Selecting the cabin section view shows you the panel installed.
Control yokes
In front of both front seats sits a column with a handle known as a control yoke. This turns the ailerons which cause the plane to roll. Pulling or pushing the yoke will move the elevators. Because they are connected, the instructor can take control at any time. Before takeoff, pilots push/pull the yoke as far as possible and observe how the surfaces react.
Rudder pedals
Each seat has a pair of rudder pedals positioned at floor level. To turn, you push one to swing the rudder and to turn the nose wheel on the ground. The toe presses it down on the top to operate the brake on that side. When taxiing, you leave your heel on the floor. This will allow you to steer without dragging the brakes.
Seats
Each occupant has their own padded seat. The pilot’s seat slides along rails to accommodate pilots of varying height. Each seat is held by a pin in a hole in the rail. Before takeoff always be certain your seat is locked. If it isn’t and you have a sliding seat you will end up with no control over the plane.
Antenna
A small fin or rod mounted on top of the fuselage is called an antenna. It receives and transmits radio messages. Smaller aircraft have multiple antennas for various systems. Notice any antenna that looks loose or bent? Report it. A broken antenna can lower your radio range.
When booking your trial flight, request the opportunity to participate in the walk around. The instructor will open fuel drains, sample the oil, test the prop, and move control surfaces. Knowing the parts by name makes each action more understandable. Be sure to wear appropriate footwear and avoid the arc of rotating props. If there’s a check that reveals an issue, ask the pilot what he or she would do, it’s typically to remain grounded.